The unceasing bordering tips. There is an almost infinite number of possibilities to create a neat frame for a digital photo. Here’s one example where we make a transitional border with the selection options.
Load the photo in Photoshop Elements

Choose a photo that needs no further editing and that has been sized or cropped according to your taste. Applying borders should be the last step in the editing process.
The selected frame

Select the whole photo simply by hitting Ctrl+A, then click on Select/ Modify/Border menu. With this you can turn an existing selection into a border selection. You will see the window above, where you can set the width of your border in the Width field. Remember that it will take place within the picture and so it will blot out some of the edge pixels. The sample picture is 450 pixels wide, so a 20-pixel border will fit well. If you are working with a 6-12-megapixel photo, a value between 100-200 would be suitable, but of course it is up to you. You can create an extra wide frame if you like.
Let’s soften up!
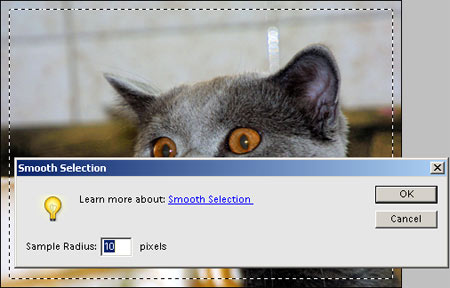
We aim for a soft, transitional border, therefore we will again use the Select/Modify menu. This time Smooth option is active as well, which allows for the softening of the inner edges of the border (or rather of the selection at this stage). Click on this point and then set in the Sample Radius window half the value given in the previousl step. We used a value of 10 pixels.
Color fill

Make a new empty layer by clicking on the first item of the top icons in layers palette. This way you will receive a layer called Layer 1, on which you can fill your border. Since the border will be made on a separate layer, it can be modified freely afterwards. You can decrease opacity (Opacity option) or you can even eliminate it.
Choose a border color to your liking in the first color selection box at the bottom of the tools palette, and then click in the border with Paint Bucket Tool. The border will be filled with the selected color.
A frame of mind

The now redundant borderlines will disappear if you press Ctrl+D. Since we blurred the inside of the border, the filling color is paler outwards. Our transitional border is now ready.
Before saving, you can unify the layers in the Layer/Flatten menu. After that the border itself cannot be modified.