Yet again, a less popular tool in Photoshop Elements, called Background Eraser Tool. With a little bit of experience in Elements, its usage can be mastered, and we are telling you now that it can be a great help.
Load the photo

What if you are bored with the usual blue sky and you wish for some excitement in the background of your photo? Well, there are countless solutions for this, but perhaps the most handy one is a simple brush, which erases background quite efficiently even if you are not really skilled with the hands.
Among the erasers

You’ll find this tool in place of the Eraser Tool icon. Just keep the left mouse button pressed on it and the small menu will appear from which you can select it. The second background remover brush in the row (Background Eraser Tool) has a tiny pair of scissors in the upper corner of the icon.
Once you’ve selected it, you just need to set the options in the upper options row that appears. Choose a comfortably high but not too high amount for the brush size (Brush). Leave Limits menu at Discontiguous, and Tolerance should be given a medium value (around 50).
Background eraser works just like its plain brother. Click with it on the background you wish to erase, and it’s gone in a second. The advantage of this kind of eraser is that you don’t need to take care of the other picture elements. A plain eraser works nicely only if you take care the edge of the elements you want to keep and work with a small eraser size. Here you can use a bigger size – what’s more, a bigger size is the better -, and no problem if you erase into elements of the foreground, because they won’t be affected. Background eraser removes only those areas that are of the same lightness and color as the color of the center. This is the sensing area: it erases in a circular shape along the pixels the central point goes. If the object in the foreground has a different color and the middle of the eraser doesn’t touch it, just the edges, then there’s no need to worry, it will survive the action without scratches. This way you can proceed quite quickly and with ease, all you have to watch is the central point.
Tolerance settings will define the extent of the difference in color and lightness between the central point and the area to be erased. Leave it at a low value to eras only the areas that are practically the same as the central point, and if you set it high, then also the much brighter and darker points will also be erased, which increases the chance that you will erase parts of the foreground as well. Therefore it’s a good idea to give it a medium value and in case the eraser is too “strong” and it removes too many pixels you can decrease it, but if it omits too big areas, increase the value.
In simple cases such as the sample photo here, you are in a lucky position and all have to pay attention to is not to touch the objects in the foreground with the center of the eraser, while you can run into them with the edges and so you can quickly erase the sky.
A new background layer
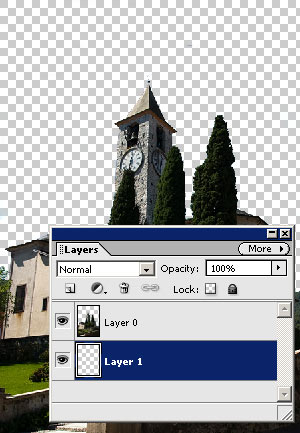
There will be a checked pattern in place of the erased sky, which signals that there are no pixels there, the photo is transparent at these parts. It looks as if we have cut out the trees and buildings in the foreground. This cut out image can be then placed onto any background, but first you need to create a new background layer for this end.
Click Layer/New/Layer menu and after clicking OK in the appearing window, you will have an empty layer called Layer 1. Grab this on Layers palette by keeping the left mouse button pressed and drag it under Layer 0 (the original image layer).
Layer 1 should remain selected (in blue), since you will now work on this.
Dawn transition
Now make a new sky. You don’t want to move too far away from reality, so a blue-purple transitional “dawn-like” sky will do, but if you feel like it, you can paste any other color, transition, pattern or even a whole new image onto this layer.
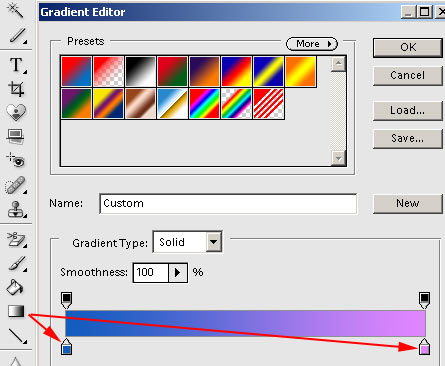
For the transitional colors select Gradient Tool (G key) in the toolbar. Click on the color in its options row and the panel above appears, where you can set the desired gradient colors. In our case it runs from a medium blue to a light purple. Finally click OK.
From where to where?

If you are ready with the gradient colors, all you have to do is draw on the back photo layer.
Keep the Shift button pressed (with this you will draw a straight gradient line) and draw a line from the top of the picture to the bottom of the sky. As soon as you release the mouse button, the blue-purple gradient colors appear.
A different mood
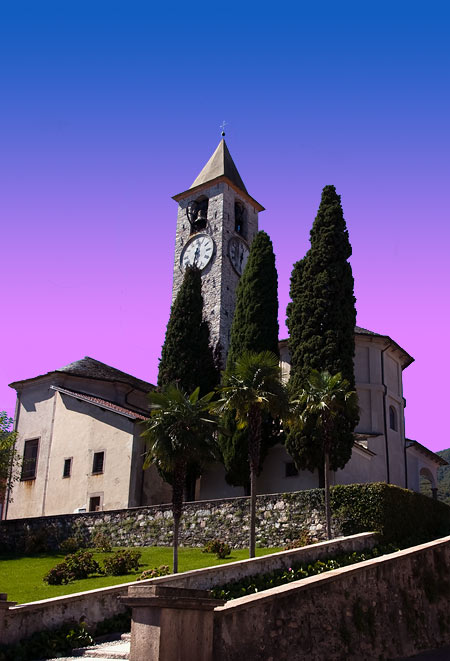
The gradient colors appear on the back layer since that’s the one selected. But since you have deleted the sky from the original photo in front of it, this is the area that shows, and so the blue-purple gradient colors will perfectly be seen. As if there was only one sky.
If you would like an even more perfect illusion, click on the original layer and modify its colors a bit more purple so that it suits the new mood even better.