This is the essence of brightness and color correction in digital photos, when you want to modify only part of the photo instead of the whole one. If it’s a continuous area, then there are countless methods with which to select it and carry out the job. But what if you want to make changes in the bright areas? If, for instance, the shady, darker areas have too cold colors in contrast with the rest of the image. Or perhaps you want to intensify the blue of the somewhat pale, mid-range sky. A software that works in the bright ranges can be the solution to these problems. One such software is Digital Film Tools Ozone plugin in Photoshop.
How is it done? Let’s look at an average photo, such as this one below.
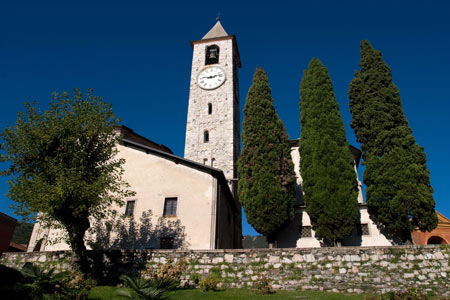
For the time being, forget its colors and concentrate on the bright hues only. In case of a normal 8-bit photo this means 256 hues, with values 0-255, i.e. from fully dark black to snow white.

Our software operating in bright ranges – Ozone v2.5 here- does nothing else but divides the full spectrum into zones, and thus you can carry out the color and brightness correction separately. Ozone can deal with 11 areas, signed 0-10. The picture below might help understand. Zero range contains the darkest parts, the shady areas, and the following zones contain the brighter areas until finally range 10 represents the brightest parts. (We are indicating only 10 ranges.)

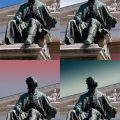
Based on the above, each zone is paired with a mask. The actual masks are represented by the small icons below the ranges. White parts of the mask indicate the respective areas of the selected zone. Only these parts will be modified by any image correction, such as brightening. Choose zone 0, for example, i.e. the darkest sections of the image, and you’ll see that only the shady areas will become brighter as a result. It is visible in the small mask image under zone 0 that only the shady areas (the darkest parts) are white. Black sections of the mask are irrelevant from point of view of the correction. Similarly, if you select the 9th zone (No.10 in the Plugin), you can see in the mask that only the frontal façade of the building is effected by the correction. This is the brightest part of the photo.
It’s time for you to get on familiar terms with Ozone plugin. After the installation, you are welcomed by the below good old window. We have introduced a few softwares from the Digital Film Tools workshop before, so this sight is familiar for those who read those articles. At the top, there’s a menu with icons, to the left of the work area of the panel you’ll see a preview of the photo, while to the right, there’s a parameters window.
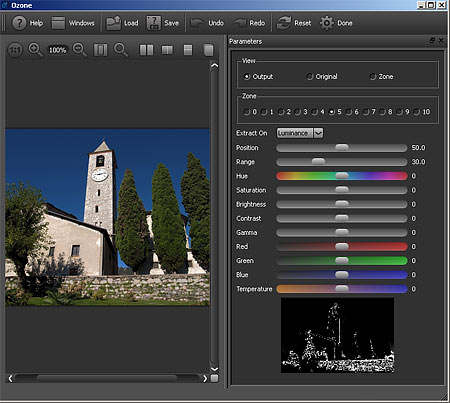
The upper menu offers the following buttons: Help, Windows (close and open window), Load (load presets), Save (save settings), Undo (undo the latest actions), Redo (redo the previous actions), and Done (finalize settings).
There’s our preview on the left, which can be regulated by the icons above it. These are as follows: full size, zoom in / zoom out, fill window, enlarge, original and modified picture side by side, vertical division of photo (original on the left, modified version on the right), horizontal division of image (original on the top, modified version below), original / modified version view (shift between them by keeping this button pressed).
But we are more interested in the parameters window on the right now. On its top, in View, you’ll find further setting options for the preview. Select Output view and then the modified image will appear in the left-side window, while if you select Original, it will show the original state. By selecting Zone, the mask of the current luminance zone appears, which can always be seen in a small size under the right-side controls.
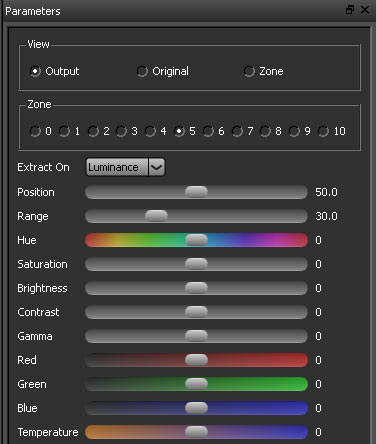
Luminance zone can be selected in nowhere else but Zone section. You can choose any value between 0 and 10, the settings below will only be valid for this zone. It is the bottom picture that will give you info on which areas they are within the zone. Anything that is bright here will be affected in the correction.
Extract On is a very important menu, where you can select the relevant color or luminance channel. Luminance is the default value, but you can select if you like Hue, Saturation, or 6 color channels (red, green, blue, yellow, purple, cyan), or even the modification of the mask created previously in Photoshop. They all have different results in the photo display.
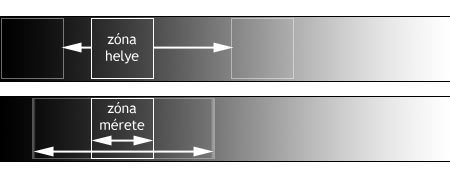
The following 11 sliders provide the real means for settings. Of these the first two should be given a closer look perhaps. Position defines the place of the zone selected in Zone section. If you select zone 5, let’s say, that involves the mid-bright ranges basically, but it can be shifted to either direction with the help of this slider. These shouldn’t really be bothered, because the factory setting puts them in quite a nice order. 0 stands for the darkest one and 10 for the brightest. Position slider can even replace the two and reverse the order.
Range slider modifies the scope of the given range. All of these have the same value by default, but shift the slider to the right to broaden the scope and the correction will affect the brighter or darker areas as well, apart from the mid tones. When you set its value high, you practically select all of the photo.
The following 9 controls are used in the actual photo correction, based on the following points:
Hue: hue of the selected area.
Saturation: saturation of the zone.
Brightness: brightness within the zone.
Contrast: contrast of the zone.
Gamma: gamma brightness of the area.
Red: strength of the red channel in the selected area.
Green: strength of the green channel in the selected area.
Blue: strength of the blue channel in the selected area.
Temperature: color temperature of the zone.
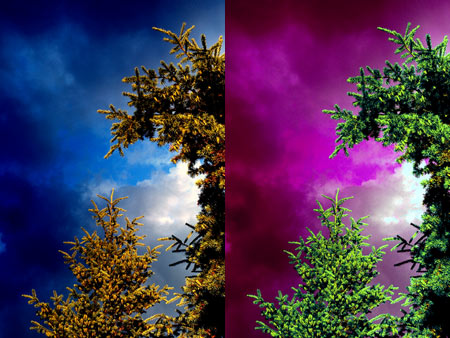
I used two zones altogether in the example below. In one of them I played with Position and Range sliders so that only the sky is selected eventually. I selected Hue option in the Extract menu, and finally changed the area of the selected sky with Hue slider. By clicking on another zone I selected the pine trees (these should be white in the preview), then this area received a greener hue through shifting the color channels Hue slider. Two different color corrections in one place. But if you have the patience, you can fine-tune all the 11 zones and finalize the effects by Done button.