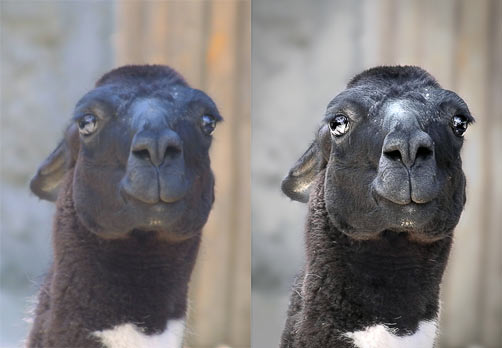
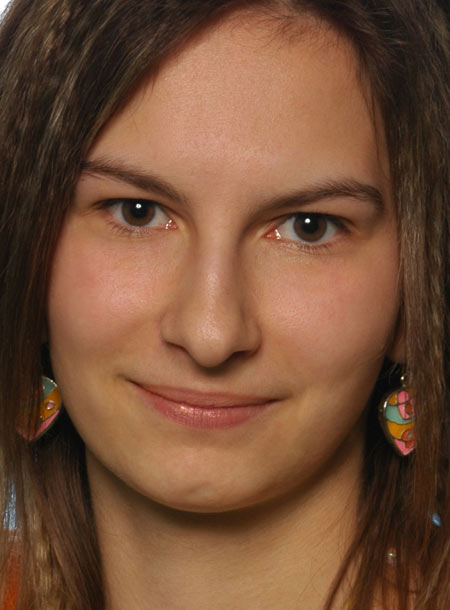
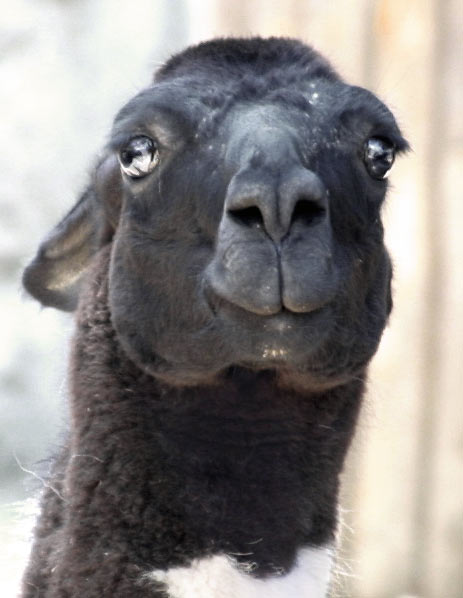
I found this picture sorting my photos after a visit to the zoo. Well, I honestly admit it isn’t the best one I’ve made. The composition is rather accidental, the background is quite unfortunate, and the whole of the photo is too soft: the colors are blurred and flat, badly bleached in a few places. But those enchanting llama eyes didn’t let me throw the photo into the Trash (or Recycle Bin if you please) folder. A few minutes of tinkering produced a handsome animal portrait for monitor or web usage.
First of all, I threw out the sides. Only the center of the picture, the head remained.

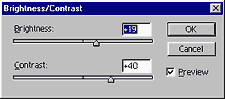
I started off with adjusting colors and contrast. I created an Adjustment Layer on the Layers palette by clicking the black-and-white circle icon at the bottom of the palette. I chose Brightness/Contrast here. I made the image a bit harsher and more contrasty with the following settings: +19 for Brightness and +40 for Contrast. I set the blending mode of the layers to Luminosity so that the colors wouldn’t get affected by the contrast adjustment.
A few elements became too sharp now, so I chose an Eraser tool from the Tools palette (Brush Size: 35, Opacity: 50%) and masked out (restored) the light area above the nose and the dark one under the chin slightly, and the white tuft on the neck to a greater degree by painting them over gradually. I adjusted these preliminary contrast settings later.
Then came the phase of color restoration, or at least, “adjustment according to my taste”.
Once again, I created an Adjustment Layer, this time clicking Selective Color. As the cold, blueish colors look irritating on the photo, these are the ones to reduce. Therefore, I chose Cyans, Blues, and Magentas from the color channels and adjusted them with the following values (setting Method to “Absolute“):
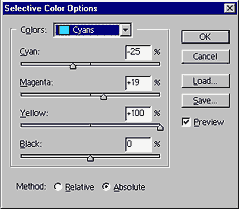
Cyans channel:
Cyan: -25
Magenta: +19
Yellow: +100

Blues channel:
Cyan: -23
Magenta: -21
Yellow: +12
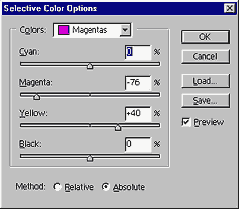
Magentas channel:
Cyan: 0
Magenta: -76
Yellow: +40
I further adjusted lightness on the Whites, Neutrals, and Blacks channels:
Whites:
Black: -10
Neutrals:
Black: +5
Blacks:
Black: +10
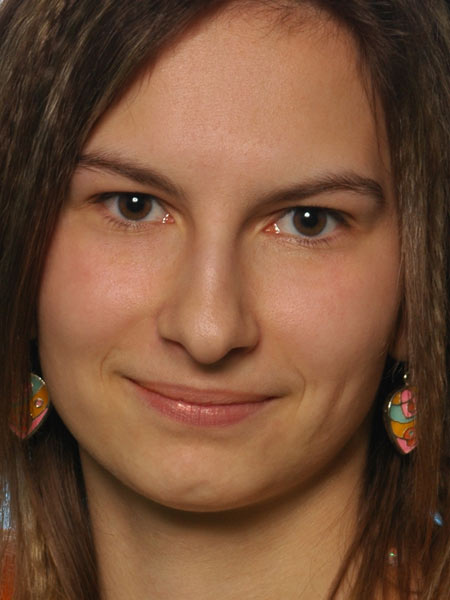
I used the Eraser tool to once again paint over the dark area under the chin and the white tuft applying an Opacity value of 50%. Blending mode for Selective Color remained Normal. Now I clicked Flatten Image to merge the layers. After contrast and color adjustment, the llama head looked like this:
Now, about sharpening.
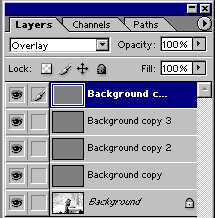
There are several ways to do this. I preferred a High Pass filter. I duplicated the Background layer, and applied a Filter/Other/High Pass filter on the new layer with a Radius of 1.0. I set the blending mode of the filtered layer to Overlay. I applied another round of High Pass with the same settings to the new layer, and copied it three times upon itself, so finally I had 4 High Pass layers. Once again, you have to decide for yourself how many layers to use. Each of them increases sharpness, but oversharpening can lead to the fragmentation of details. I judged that the result of using 4 layers is just not too irritating. Oversharpening can already be observed on the result, but the structure of the fur can bear it nicely as the false details and the slight noise that are created enhance the (illusionary) detailedness of fur when inspected. If you find a more timid sharpening more acceptable, use only 2 or 3 layers.
Click Flatten Image to merge layers when you’re satisfied with the result.
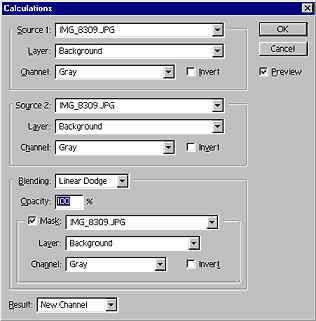
I noticed that sharpening also increased some noise that is particularly annoying on the blurred background. In addition, further blurring of the background, however slight, wouldn’t do any good to the general effect. But in order to eliminate the noise in the background, you have to select it precisely. That is, you have to separate it from the head which is way too detailed to select with simple tools. I thought the Image/Calculations feature would help. I set the two Source channels to Gray, and Blending to Linear Dodge. I also switched on Mask and chose Gray here, too. I set Result to New Channel. Most of the background became white, while the majority of the llama head remained dark. This image would make an ideal mask.
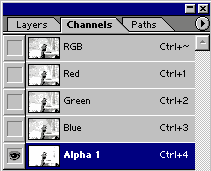
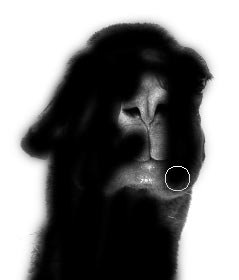
I clicked OK to put the light image on the Channels palette as an Alpha Channel. I switched to the Channels palette and left the Alpha channel selected. I chose the Brush tool from the Tools palette, and painted over the middle areas of the head—down to the middle of the neck—with a soft black brush sized 65 pixels. Afterwards, I painted the not totally white areas of the background with a similar brush of white color. The point was to make the llama head almost totally black and the surrounding areas entirely white. This action took about half a minute, i.e. significantly less than trying to select the head following the tiny hairs.
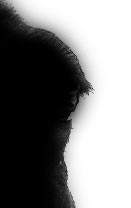
A detail zoomed to 100%
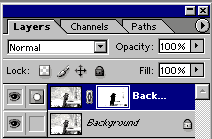
After I had finished the above action, I clicked the Alpha channel while holding the Ctrl key in order to make the light areas selected. I switched back to the Layers palette, duplicated the Background layer and created a layer mask on the new layer by clicking the Add Layer Mask icon (the rectangle with a hole) at the bottom of the palette. This way the Alpha channel selection became a layer mask visible besides the new layer. All the changes made to the layer affected only the light areas indicated by the mask.
From the mask rectangle, I switched to the layer image and applied a Filter/Blur/Gaussian Blur effect with a Radius of 5.0 to blur the background and thus, the noise. The blur also affected a few side hairs on the head, so I switched back to the mask and used a 35-pixel soft eraser to paint over the areas along the head’s edges. You can set Opacity to a value below 100% for a finer result. Erasing from the layer mask makes the blur less visible on the areas that have just been painted over. Afterwards, I merged the layers.
The picture started to take on its final form. It was time to crop it, as I only needed the head. I selected the area with Guidelines first, then with the Rectangle selection tool. All I had to do was to click Image/Crop.
I wanted to emphasize the portrait feeling, so I decided to darken the corners in order to focus more on the middle of the picture (the main theme). This is called vignetting. It is originally an undesired side effect of camera lenses. If you find it that repulsive, skip this step. I think it could do some good to a picture if used in moderation.
So I switched to the ellipse selection tool and dragged a nice vertical ellipse marquee from the upper left corner to the lower right.

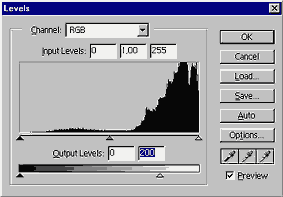
Then I pressed Q to switch to Quick Mask view and applied a Filter/Blur/Gaussian Blur effect with a Radius of 30 pixels. This blurred the edges of the mask. Pressing Q again brought me back to the Normal view. I right-clicked the image and chose Select Inverse. This way the corners of the picture got selected with a nice even blur. Any effects or changes would only affect these areas. As I wanted to darken them, I clicked Image/Adjustments/Levels and dragged the white triangle in Output Levels to 200. Then I clicked the middle of the picture to cancel the selection.
After all this, I made those llama eyes even more enchanting with the Burn Tool. I used a soft brush with a 45-pixel size and Exposure set to 35%, Range set to Shadows, and clicked the eyes a few times. The tool darkened the dark areas even more, thus emphasized the shining eyes. Once again, this has to be used in moderation!
Auto Contrast also did some good to the image now.
I still found the background a bit too light, so I switched to the Channels palette and clicked the still existing Alpha channel while holding Ctrl. This selected the background again, and I chose Image/Adjustments/Brightness/Contrast with Brightness set to -40.
The picture would, of course, still bear hours or days of refining, but the result is already a lot better than the original. Just look at the difference: