Although Photoshop really offers a broad range of sharpening tools-especially since the introduction of Smart Sharpen-we took a glance around slightly different, alternative sharpening solutions. This is how we stumbled upon Focus Magic, which is a real 2-in-1 solution instead of a simple “sharpen” plugin.
The trial version of Focus Magic can be downloaded free of charge from the developer’s website, and the first good news is that it’s only 4.4MB. The trial version is unlimited in its functionality but unfortunately expires after 10 uses. The license costs $45. The plugin can be started after the trial period has expired, but the results cannot be saved.
After installing, you don’t only get a Photoshop plugin, but also a separately usable picture sharpening application. In this application, you can choose from five different filters, each responsible for sharpening and blurring. But let us keep our eyes on the Photoshop plugin instead.
This offers two features, and we think you’ll be satisfied with both. One is sharpening and the other is motion blur reduction.
Click Filter/Focus Magic in Photoshop’s menu to activate the plugin that offers two choices:
- Fix Motion Blur – Motion blur reduction
- Fix Out-of-focus Blur – Simple sharpening
Sharpening photos (Fix Out-of-focus Blur)
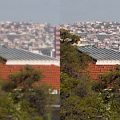
If your camera (or its user) has set an incorrect focus, but the details are preserved in the photo, it is time to use a sharpening filter or plugin. If the focus is completely messed up or the photo is totally blurred, post-production won’t do much good. So what’s the difference between sharp, soft and blurred?

The picture part on the left is sharp. Edges have contrast, details are easily visible. The middle picture is soft, slightly blurred. Contrast differences of the edges are more difficult to get, but the details are still nicely distinguishable. This picture is perfectly fit for sharpening in post-production. The right-side photo part is blurred.
Details are gone for good, which means sharpening will create rough or false edges and details. You shouldn’t try sharpening on such photos.
Focus Magic’s most taking characteristic is the strife for simplicity. There are numerous sharpening plugins but most of them tends to throw out the baby with the bath water: they usually offer several dozens of different options but this means that after a certain time you won’t be bothered with the regiments of sliders, check boxes and dropdowns.
Three or four settings, and an accurate detail-emphasizing ability is all you really need, and Focus Magic does have this potential.

You have four controls in total to deal with.
Image Source lets you specify whether the photo has been taken with a digital or a traditional camera, a DV cam, perhaps scanned from Newspaper or from an old, battered (Forensic) photograph. The plugin does the sharpening according to this selection. Obviously, a soft, noiseless digital photo needs different treatment than a heavily grainy paper photo.
Blur Width lets you specify the extent of blurring. The lower the value, the smaller details can be sharpened. Using higher values is recommended for heavier blurring, but, as explained above, you shouldn’t have great expectations in such cases. A downsized digital photo for Web publishing usually requires a value of 1 to 2.
Here are a few examples on how to use Blur Width. We’ve set it to 1 for this soft photo to treat the finer details nicely.

The next illustration shows the same photo part with a Blur Width value of 6, telling the plugin that the photo is seriously blurred. As it could be expected, it produced an excessive sharpening that ruined the existing details of the photo. Try increasing the value in steps of 1, and adjusting the other settings accordingly.

Amount lets you specify the extent of sharpening as a percentage. A slider would have been nice for even more accurate control, but the scale from 0 to 300% (in steps of 25%) will have to suffice.
The last setting is Remove Noise. Sharpening may increase the existing noise level of the photo, and thus it can produce an unpleasantly grainy image. The option can also be used to remove Dust and Scratches from scanned paper photos. By Blur Width values of 4 and above, this option becomes available and can be used to reduce noise as follows:
- Auto: automatic adjustment
- Yes: forces noise filtering
- No: prevents filtering even by high Blur Width values
- Dark Only: filters only dark areas
- Lights Only: filters only light areas
The extent of removed noise is displayed in the lower status bar of the dialog (Noise Removed=…%).
You can see the result of your settings in the After preview pane on the upper right, and the original picture in Before on the upper left. Click an area in the preview image on the left to select which part is displayed in these panes.
Eliminating motion blur (Fix Motion Blur)
This time, we’ll have a somewhat harder job than with soft photos, since motion blur shows in pictures in a rather special way and in truth it cannot be fixed perfectly. Let’s rather say reducing or cloaking instead of elimination. The software will be unable to cope with more severe motion blurring.
Fix Motion Blur works the most efficiently if the direction and extent of the motion can be determined. If you take a photo by hand, with a long exposure time, the final blur can be composed from movements in several directions.
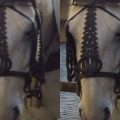
The image below shows a motion blur of a single, almost vertical direction that makes the horizontal edges look like they were duplicated.
Direction of motion

The Fix Motion Blur dialog is almost identical to that of the plain sharpening feature. The only exception is the Blur Direction field for the information we just mentioned. It has to be specified in degrees and there is a small compass to help. In this example, the direction is 290 degrees.
Image Source, once again, lets you specify the source of the image (e.g. digital camera, analog photo, scanned picture).
The other important setting is Blur Distance. It is basically identical to Blur Width, discussed above. It needs to be specified in pixels, in this case it is about 5.

Amount is the extent of reducing motion blur (as a percentage). If you manage to identify Blur Direction and Blur Distance accurately, you should try lower values for Amount first and increasing it in smaller steps. An excessively high value produces rough or false edges. Slightly rough edges cannot be avoided anyway when fixing up stronger motion blur. Sorry, it’s part of the job. You shouldn’t expect fine details and edges.
The last setting is Remove Noise, the same as above. It can be used to remove stronger noise, or dust and scratches.
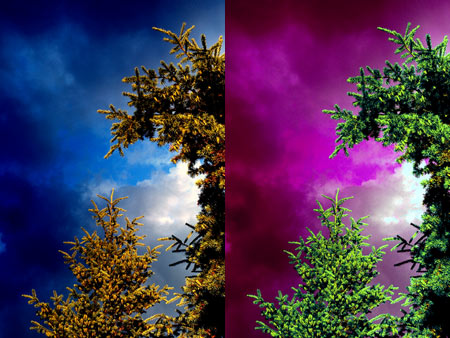
Here’s the result of the settings displayed above.

The change is even more spectacular if you take a look at a characteristic part of the blurred and the sharpened photo each. To the left, you can see the blurry one. You can easily spot the duplicated edges on the petals and the stamen. In the fixed picture on the right, the blurred edges are gone. The resultant sharpening looks a bit rough, but most of the details can be seen better. If the photo is large enough, and you want to publish it on the Web, downsizing can produce fairly nice results.

Version 3.0 of the Focus Magic plugin (and the stand-alone sharpening tool) can be downloaded for Windows and Mac OS systems from this website.