You can often observe that when a photo contains a bit more noise than usual, Photoshop’s basic sharpening tool, Unsharp Mask significantly increases existing noise around the edges. All you can do is to define for the program yourself which areas to sharpen and which to ignore. Of course, a blurred background is not worth treatment, as you won’t find anything to sharpen apart from noise.
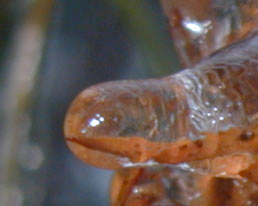 (photo detail)
First, we’ll create a contour mask, as our aim is to select only the edges in the photo, but not the background and other blurred parts..
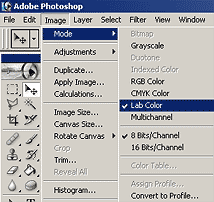
Click Image/Mode/Lab Color to change to Lab Color mode.
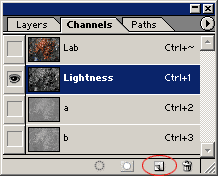 Select the Channels palette. You’ll need the Lightness channel that contains the lightness values of the picture. Channels ‘a‘ and ‘b‘ contain color components. Select the Lightness channel and drag it to the small document icon at the bottom of the picture. This way, you duplicate it to a new Alpha channel. In this case, the new channel is an exact copy of the Lightness channel that you can change freely without modifying the picture. If you changed Lightness, the changes would be visible in the picture. We’ll try to catch the edges in the photo on this new channel, to make them easily selectable
Leave the new channel selected. Click Filter/Stylize/Find Edges. This filter finds the edges in the photo and adds a dark contour to them.
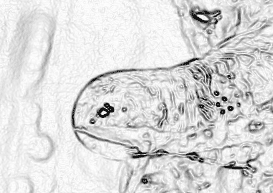
This way, Photoshop can easily select the parts with big contrast differences. The dark edges are too crisp in several places, so we emphasize and then blur them to make smoother transitions.
Click Filter/Other/Minimum and use a Radius of 1 or maybe 2. We have used 1. As this led to unexpected edges with the Filter/Noise/Median filter, use a radius of 2, do some refining, and then smoothen it all with Filter/Blur/Gaussian Blur. We’ve used a radius of 2 for this filter, too, but you can use a value of 1-3, according to your taste and picture size.
 As we need to sharpen the edges marked in dark, and the program will select the light areas, invert the picture by clicking Image/Adjustments/Invert (or pressing Ctrl+I). The result so far:
 Now you can do the selection. Simply click the duplicated Lightness channel while pressing Ctrl.
 On the Channels palette, change back to the main channel (Lab), and in the Image/Mode menu, switch back from Lab to RGB Color.
Press Ctrl+H to make the selection marquee invisible. The selection is still active, but the unnecessary marquee disappears and lets you watch the sharpening more closely.
All that remains is to finish the sharpening on the selected areas.
Click Filter/Sharpen/Unsharp Mask. In this example, we have used 350 for Amount, 5 for Radius and 0 for Threshold, but of course you can use any values you like.
After sharpening, select the Marquee tool (press M) and click somewhere in the picture to remove the selection.
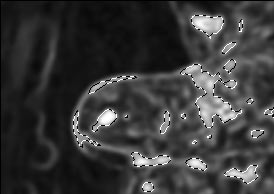
The final result:
 Sharpening can only be seen around the selected edges. Background and noise haven’t been increased or sharpened considerably.
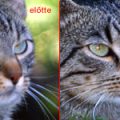
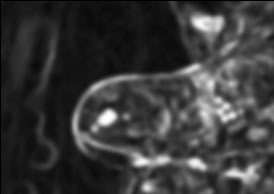
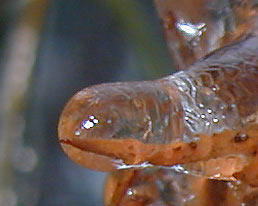
This was the original picture before sharpening (detail).
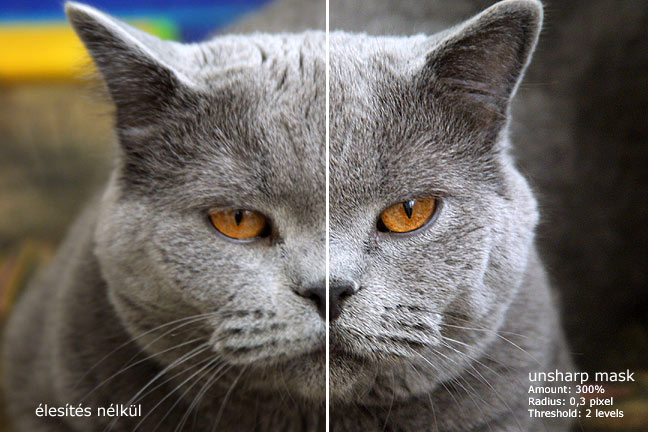
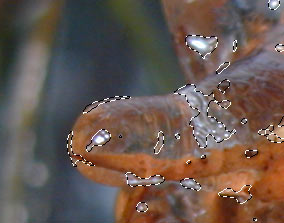
 This is how it looks when using the same Unsharp Mask setting without applying a contour mask. You can easily see the increased noise in the background. The graininess in the other parts that can be first mistaken for details is also noise.
The procedure introduced above looks complicated at first, but after mastering it, you can use a contour mask boldly for other purposes, e.g. noise filtering. If you don’t want to repeat the whole procedure all the time, make an action with average settings values to speed up your work.