Smart Sharpen is a new feature in Photoshop CS2, which is a selective sharpening filter. The new filter brought radical changes and much-much better setting options compared with the usual Unsharp Mask. We will now look into its Basic mode, which can be a perfect tool for bringing out the details of a small photo meant for the web. Surely many of you have experienced that an image which has been processed afterwards and then uploaded to the internet, appear somewhat soft. Well, here’s how to bring out the hiding details with an additional step.
Load the photo in Photoshop

As mentioned in the introduction, the next set of actions are meant for photos with adjusted size. In this photo there are loads of details (foliage, small features of buildings) that are yet to be “confirmed”.
Smarthead

Smart Sharpen filter is to be found under Filter/Sharpen menu, but only in Photoshop CS2 or higher versions.
Basics
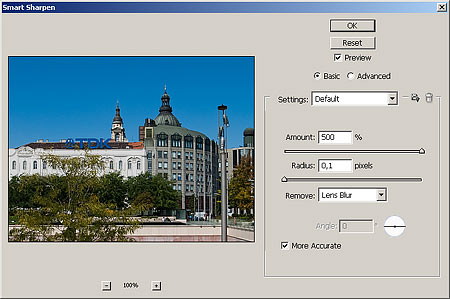
In the appearing dialog switch to Basic mode (this is the factory setting).
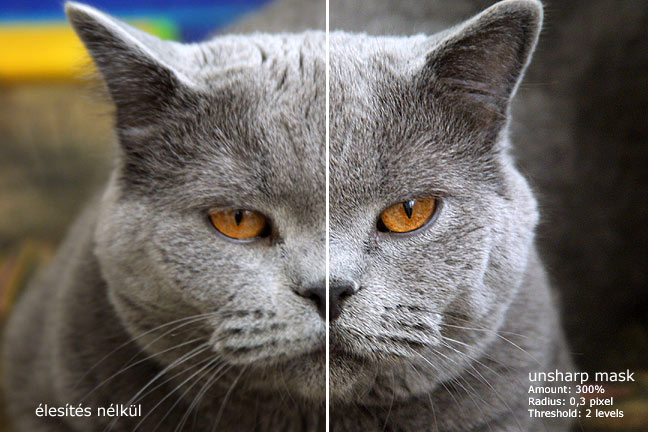
The first two sliders may be familiar from Unsharp Mask. Amount will regulate the strength of sharpening. The bigger its value, the more definite the effect. Radius adjusts the radius of sharpening, i.e., the width of the effect along the edges. Use a small value in case of fine, tiny details, such as in the example, while set it high in pictures with blurred or wide edges.
Our photo is fundamentally sharp, we just want to emphasize he small details. Therefore first set the Radius slider to 0.1-0.2. This amount will do. Next comes Amount, or strength. If you have set Radius to 0.1 pixels, you can go and pump this up to 500%, but if it was set higher, then put this to somewhere in the middle. Check the preview on the right (in 100% view!) and make changes as necessary. What matters is that you should prevent the photo from falling apart, bright additional edges should not appear, but the details should get some plus in appearance.
Remove drop down menu and Lens Blur options will be needed here. To achieve really fine sharpening, select More Accurate box at the bottom. Without this you will get too harsh edges, even with a low Radius.
Just like a razor?

Our sharpening method has brought out almost pixel details too. As you can see, the soft picture due to resizing practically throws sharpness into our face.