The tip in this Photoshop article will be the most effective when dealing with dull, “grey” photos, slightly underexposed ones without large light areas. A greyish, expressionless sky, dull colors, perhaps a slight color veil, for instance in a green-cyan hue. Perfect!
Load the photo in Photoshop

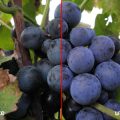
Here’s a picture that meets all the criteria we specified. Boring colors, a slight underexposition, and a greyish, colorless general effect. This is how it came out of the digital camera. Out task is to breathe some life into it.
Make it double

You should know the first step by heart: duplicate the background layer. You’ll be working with the copy layer all the time. Drag the Background layer onto the Duplicate layer icon (the second one from the right on the palette), or click Layer/Duplicate Layer.
Color burning
Now click Image/Apply Image. You have to set the fields indicated above. First, select Invert beside Channel, and set Blending to Linear Burn. Afterwards, select the Mask layer at the bottom, and a new dialog region will be displayed. Use exactly the same settings everywhere except for the JPG names. Obviously, use the name of your opened photo here.
If the colors are a bit cold in the picture—just like in our example—, select Green under Channel. This will produce warmer colors later.
Mixin’ it
Setting the blending mode is all that remains. Choose Color Dodge.
Summertime
At last, we regained the original colors to the picture we took in summer sunshine. The photo’s alive! It also became a bit lighter, so if you apply this procedure to a picture that contains lots of light areas, these can burn out. However, this grey image proved to be perfect for illustration.
If you find the result too harsh, or color noise increased too much, decrease Opacity.