Photoshop CS2 offered many novelties to digital photo enthusiasts. One of those was the filter pack for correcting the most common lens defects, such as vignetting. This issue is primarily caused by an optical defect in the lens, but possible reasons also include an intruding filter glass, converter or sun shade. If you don’t take such elements into account or have no option to counter them when shooting, then only good old Photoshop remains.
Load the photo in Photoshop
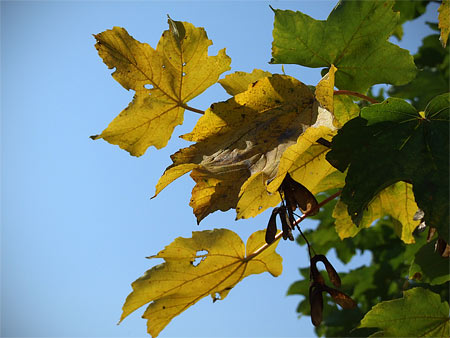
Most of the time, vignetting can only be noticed on homogeneous areas like a blue sky. Of course, if it is as prominent as in our sample picture, it will always be detectable and annoying. Get your Photoshop ready!
Mr. Corrector
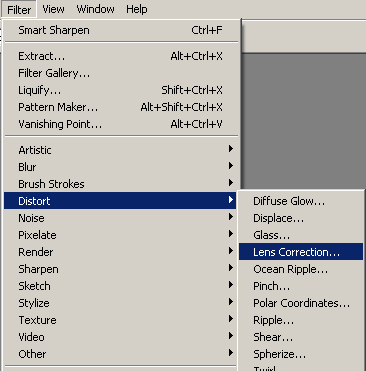
Click Filter/Distort/Lens Correction.
Jack of all trades

The dialog offers a cure for many optical defects, but for now, the Vignette section will suffice. Before you begin, enlarge the preview on the lower left so that it comfortably shows one darkened corner. If you’re already working with a large photo, you probably won’t need this. However, be sure to toggle Show Grid off, as it will most likely just disturb your work.
Getting the values right
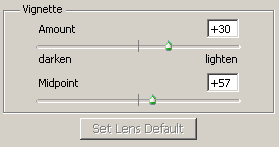
Under Vignette, you can specify two settings: effect intensity (Amount) and transition size (Midpoint).
The Amount slider can be set between +/-100. Positive values (right side) lightens the corners, while negative ones (left side) darkens them even more. In this example, common sense suggested a value about +30.
As the action will mainly affect the corners, use Midpoint to specify the size of the area left undarkened. Possible values are from 0 to 100 (the default is 50).When set to 0, only the very middle of the picture is left unchanged, and the rest will lighten up (or, if you say so, darken) with a soft transition towards the corners. When set to 100, most of the picture will remain unchanged, and only the far corners will be adjusted with a fast transition. For this photo, we chose a value of 57.
Everything’s clear
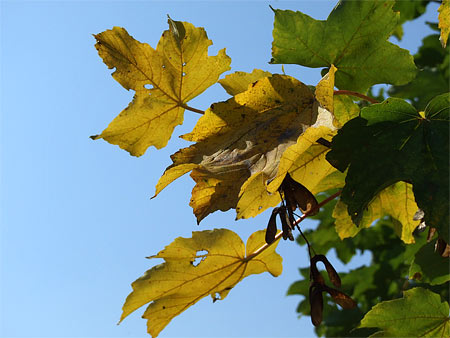
In the end, the corners show a more even lightness. Like we said in the beginning, this is most obvious in homogeneous areas, but of course it affects all corners just the same. Compare this to the original picture!