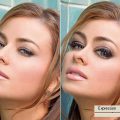
Some time ago, we were already dealing with this photo. Its owner asked us to remove spots and wrinkles from the face. We did this, except for the more important mimic wrinkles like the small groove at the corner of the mouth, invoked by the smile. These have serious impact on a face, are not to be avoided at any cost, since their removal can easily alter the whole character of the face, or cause some harder characteristics to be brought to the surface.
Now let’s try how this works and remove those mimic wrinkles.
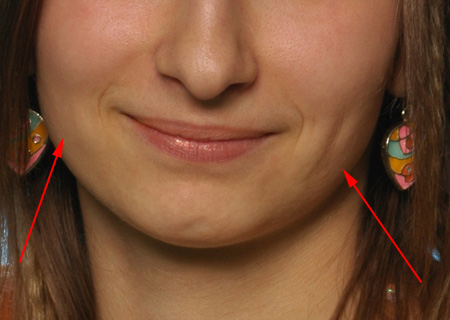
The picture above is the untouched original. You can see that the chin bone is quite characteristic. However, the grooves around the mouth counter its emphasis as they make the face look slightly thinner. Removing them means you have to measure two things. A fully smoothed face will make the model look like as if inflated with air, so it has to be avoided. Even if you remove the wrinkles, preserve the original shape of the face. Leave the shadows intact as the smooth skin surface will make the model look rounder. Of course you can fiddle around in Photoshop to remove this effect afterwards, but why bother if you can preserve the character more easily? The other thing you have to keep in mind is that the chin bone will become more prominent. Due to a wide smile or a hung head, the bone can be already more emphatic than in real life. This can be corrected afterwards as well. Basically, this is what today’s article is about.
Remove the wrinkles as described in the previous article, using Healing Brush (press J).
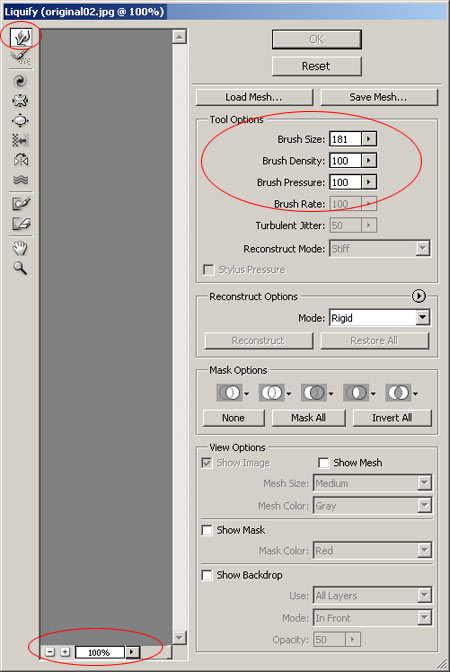
To weaken the chin bone, use Photoshop‘s plastic surgery tool, Liquify, available in the Filter menu. The appearing dialog contains a whole new toolbar, from which, we’ll primarily use the first two buttons. To modify the chin, we selected the first one, Forward Warp Tool (press W).
It is important to use the zoom menu at the bottom before making any changes, as you can work much more accurately with a zoomed image. Fortunately, the preview image on the Liquify dialog is large enough.
Specify brush size and other properties under Tool Options. Look at Brush Size first. We tried to select a large brush, as wide as the chin. This way this facial area can be altered in just one click. Brush Density controls effect intensity. By low values, you have to go through the same area multiple times and blur the image to a greater deal. We needed a definite alteration instead, so we used 100%. Brush Pressure is the strength of the imaginary brush stroke. If you set a low value and drag the brush, its effect gradually fades after a time, as if you dipped it into paint which ran out. Of course, there’s no paint here, Liquify resembles clay sculpting more than painting. The value we set here was also 100%.
The Reconstruct Tool under the Forward Warp Tool also deserves mentioning: it enables you to revert the areas painted with it to their original state.

As I told before, imagine Liquify as clay sculpting. The face in the picture is a soft clay statue that can be shaped, stretched and narrowed easily.
We wanted to get rid of the areas marked with red on both sides by clicking with the midpoint of our 181-pixel wide brush on the prominent corners of the chin bone and dragging a bit inwards while holding the left mouse button pressed. The face already became narrower.
If you don’t succeed at the first try, use the Reconstruct tool to restore the original face and try again.
It is very important not to go too far. Liquify itself is something of an extreme, as it interferes with forms created by nature, but under no circumstances do we want the face to be altered beyond recognition, as that belongs more to the world of caricatures. (By the way, Liquify is a great tool for making caricatures, if that is your aim).
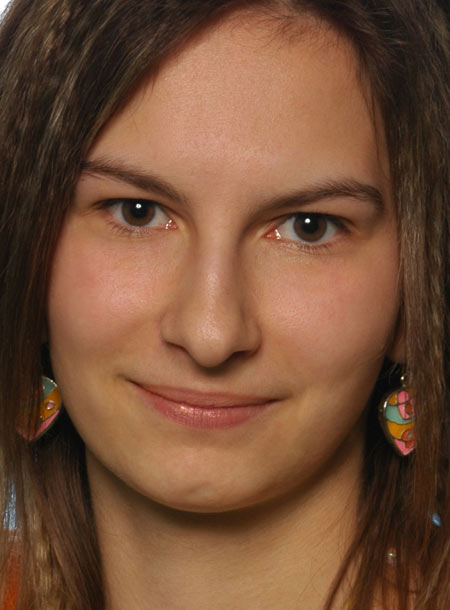
We’re done with the picture. We recommend the first version to those who want to retain the natural feel of the face and only want to get rid of annoying defects.
We tried to interfere with the chin bone very slightly, in order to not affect the character too strongly. We hope we were successful.
But from now, only your imagination can limit your mouse and Photoshop. And as we know, imagination knows no bound.