That blasted color defect! It always comes at the worst moments. But it cannot frighten seasoned old image editors who have seen even more than 50 Digiretus articles! Just like the last time, we can fight it boldly and effectively. This Photoshop tip is recommended for those dextrous apprentices who don’t get scared from having to take a job into their own hands instead of letting it be carried out by a dumb automatic feature. Doing post-production manually always brings better results. This is the case now, too: we’ll take on this task armed with a desaturating brush. The procedure can be especially effective when the color defect displays along less saturated edges.
Open the photo in Photoshop
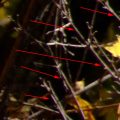
This picture shows a nice example of chromatic aberration. The purple borders along the edges are the most eye-catching, but yellowish stains can present a problem as well. We’ll fight both of them.
Sponge tool by your side

Select the Sponge tool from the Tools palette (or press O). This tool basically lets you make colors brighter or duller, and can be used in the form of a brush.
Tool settings
![]()
The options for the selected Sponge tool are displayed at the top of the application window. Brush specifies the brush size. It is recommended to choose a size similar to that of the color defect you want to get rid of. As this is a fine work, never use a too large brush. You should also choose a soft brush with a transition. We have used a size 9 brush.
Set Mode to Desaturate.
Flow specifies the strength of the brush. You should keep it at 100% as a brush stroke won’t rob the area of its colors at once. You’ll have to pass through an area multiple times to make it totally colorless.
Fighting the aberrated edges
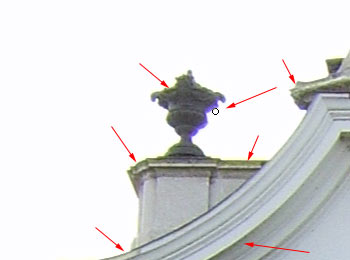
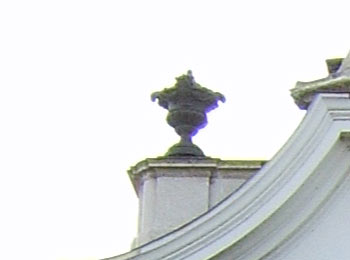
Paint over the defective edges with the Sponge tool set to Desaturate mode. You’ll find them mostly around borders with a large contrast difference. In this particular case, this means where the edge of the building meets the light sky, but you can spot pale yellowish edges looking at the inner contours of the building. As the decolorizer tool is really effective only when used several times, you should paint over the affected parts more than once.
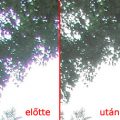
All’s well…

…if it ends well. You can see that the color defect has vanished without a trace. You can save the picture or carry on other editing tasks.