News | Articles | Books | Links |   Digiretus.hu |  Digiretus.ro| RSS
Lightroom|2013.05.20.
Photo review|2013.05.11.
Photoshop Tutorials|2013.05.05.
Photoshop Tutorials|2013.04.18.
Android|2013.04.16.

Adobe Photoshop Lightroom — Gradient gray filter


A virtual filter against the bleached sky


Photo reviews – Stairs, Gate


The world of interiors


Blurring reflections in Photoshop CS2+

level: easy


How to make an accidental reflection on the shiny parts of a photo unnoticeable.


Removing unwanted elements from pictures III in Photoshop

level: easy


Yet again, those silly wires hanging in your picture.


Adobe Photoshop Express - Part I - Cropping and rotation


What else would we discuss in our first article about Androids but the mobile version of the king of photo manipulation, Adobe Photoshop Express.


Which photo editor do you often use?

Photoshop
GIMP
Photoshop elements
Paint Shop Pro
other software
nothing


Search this site


PS Tutorials|2012.05.28.

Removing red eye effect III. in Photoshop CS2

level: easy


This time with a Photoshop CS2 paint brush.


Free Photoshop Tutorials: Correction of white balance errors II. in Photoshop

Version: Adobe Photoshop 7.0 +


level: advanced

Yes, of course, we know there are scores of plugins and built-in features for newer Photoshop versions that correct the shifted white balance in seconds. This tip is not aimed at those who lack free time but masochists. Or, in a nicer way, at people who like to experiment, tread new roads, even if those roads are long and winding. We haven’t used the Curves feature for more difficult tasks yet. So now it’s time!

Advertisement
 

Printer-friendly version

Photoshop Tutorials - Correction of white balance errors II.


Photoshop Tutorials - Correction of white balance errors II.

1.Open the photo
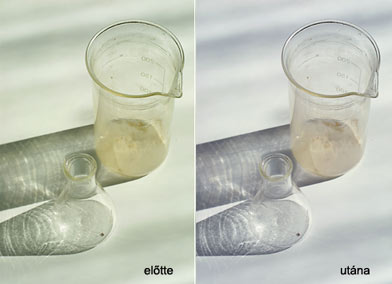
Somebody has messed up something on a grand scale with white balance here.

First, you should assess in which direction the picture diverges from the colors perceived by the human eye. This time it’s a fairly fast job as the originally white background spurts an unwanted and easily spottable blue-cyan color.

To treat this, you have to adjust the curves for the red and green color channels while leaving the blue channel untouched. For a greenish tint, adjust the blue and red channels, and for a reddish one, blue and green.

Photoshop Tutorials - Correction of white balance errors II.
2.Green color channel
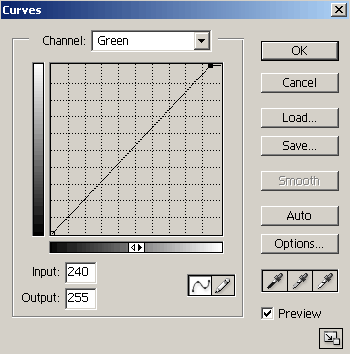
Click Image/Adjustments/Curves. At the top of the dialog, choose Green from the Channel dropdown.

Click the upper right handle of the curve and drag it upwards.

Photoshop Tutorials - Correction of white balance errors II.

3. Red color channel
Do the same after selecting the Red channel. Be sure to select the Preview check box so that you can keep an eye on the effect of the changes you are making. If the result needs refining, change back to the green channel and adjust it as needed. You can also type in numeric values in the Input field, e.g. in steps of -1. Adjust finely the red color channel’s Input value as well to restore the color levels you want.
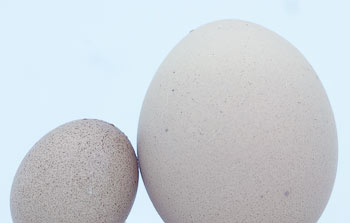
Photoshop Tutorials - Correction of white balance errors II.

4.Just like two eggs
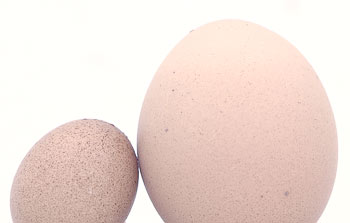
The colors of the resulting image look much more realistic.


Related Free Photoshop Tutorials

Correction of white balance errors


Advertisement


Impressum
| About us

© nEtural webdesign 2006.
All rights related to the free use of any pictures, sounds, written material and graphical elements published on the web site are reserved by the site owner. The owner's approval is required for the use of such published elements.