Crop a complex shape from its background using a new masking plugin
Simpler shapes or themes, distinctly separating from the background, are very easy to cut for, say, placing them into another picture or a different backdrop. However, more complex shapes like animal fur, hair or foliage often trick the software. Masking out a theme can be conveniently solved by dedicated tools like the recently renewed ReMask 3 by TopazLabs.
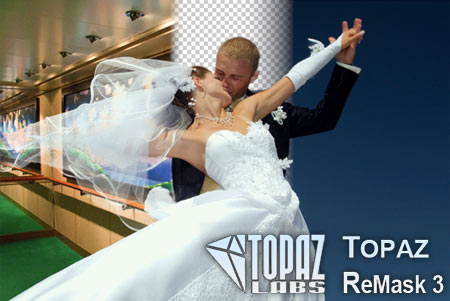
It is a Photoshop plugin with the primary aim of making the time-consuming process of masking quicker and more accurate.
A 30-day trial version is available from the developer’s website at no cost, so that you’ll know what you’re buying. It is unlimited in its functions, and its trial period can be activated using a free serial. The downloadable file is about 35MB, which is not really small for a plugin. Installation is very easy, practically fully automatized. Open Photoshop and load the photo from which you want to crop the shape, and click Filter/Topaz Labs/Topaz Remask 3 to start the plugin.
This is our sample photo, and the shape we want to cut out is of course the cat.

The task won’t be very easy. Although the main theme has quite different colors, the picture rather lacks sharpness in original size, and the pet’s contours are not very defined everywhere.

Topaz ReMask is a pretty complex software, so at first, we’ll only cover the basics—how to crop what you want, in the least time.
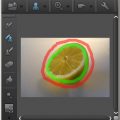
This is how the plugin’s user interface looks. In the preview area, a green veil covers the image. This green veil represents areas to be preserved. This means, for now, the whole picture is selected. However, we only want the cat, so that is the only part which should remain green.
The most important masking tools the plugin offers are on the toolbar in the upper left part (Brushes – Basic). There are buttons with a green, a red and a blue brush.
Use the green one to paint over parts you want to retain. The red one is for masking out the areas you want to get rid of— it is a marker for unwanted elements. The blue one can be used to mark the working area for the cropping software—that is, the contour along which you want to crop the theme.
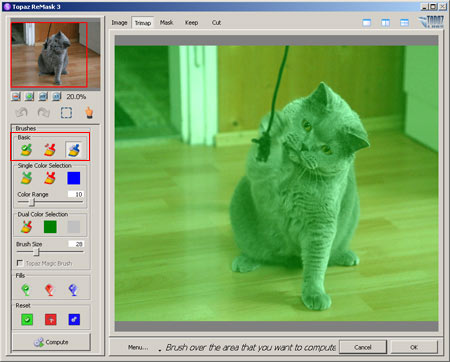
In the first step of masking, click the blue brush. The Brush Size slider can be found a little below. You can use any size. The point is to have a conveniently thick brush as you don’t need to be very accurate with the marking.
Before starting the selection, you may want to set zooming to the original size. Under the preview image in the upper left corner, click the 1:1 button. Hold down Shift and drag the mouse pointer to pan the picture.
Now carefully draw a contour with the blue brush around the theme to be cropped so that one half of the blue line covers unnecessary background and the other the edge of the theme.
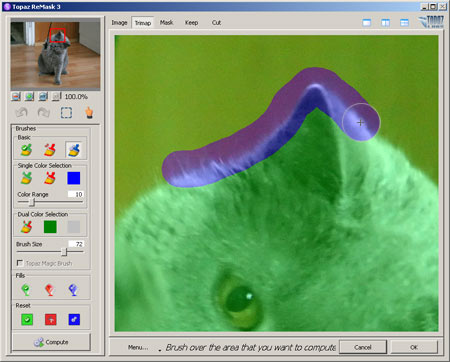
Work your way with this method around the whole area to be cropped. You don’t need to be totally accurate, since it is the software that will calculate the exact place of the cropping (the mask borders). This is a very quick procedure, even a more complex, hairy, bushy, furry shape can be marked around roughly in a few seconds.

The blue border specifies where the plugin should consider the mask borders, and the red area sets what is to be discarded by any means. You can use the red brush to paint over the latter areas, but you’d better select the red tool from the Fills toolbar and click anywhere outside the blue border. But before doing so, click the Fit button on the left of 1:1, to switch back to a smaller zoom.

So, the selection is done. The green areas are to be retained, the blue one is the working area to be considered by the plugin, and the red one is to be discarded. Click Compute in the lower left corner to start the necessary calculations for masking out the selected shape.
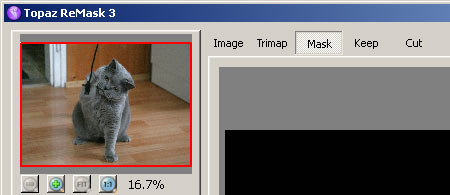
After the computing, the plugin automatically switches to Mask view, showing the cropped area in white, and the discarded one in black. As you can see, the cat was not cropped exactly along the blue area—the plugin calculated where the fur and the background meet within the blue region.
You can switch views using the tabs above the working area:
Image: the original picture
Trimap: the three-color selection
Mask: mask view in black and white
Keep: the cropped, retained area
Cut: the discarded area
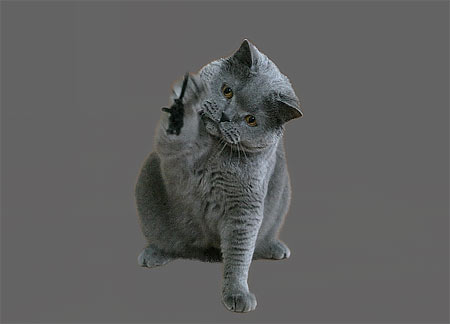
Here’s the cropped picture. This method was way faster and a lot more accurate than using the good old manual selection procedure. The cat has been put on a new layer, so you can put any kind of background behind it, or you can copy and paste it into another image.
A coming article will discuss how to refine the edges of a calculated mask. For instance, there are a few chamois background remains along the cropping. Topaz ReMask can handle them, too.