Christmas is over! All the preparation was such a good theme for photography, and naturally, so was the holiday mood. And the greatest hit is of course the Christmas tree, simply or overly decorated. In this rather irregular article, we try to enclothe an average Christmas tree into festal lights by using Photoshop’s Lighting filter, carefully avoided by our soul, with a natural affection for beauty, in other cases. A bit too arty? It is. But you can easily forgive that at the end of the year.
1. Here you can see…
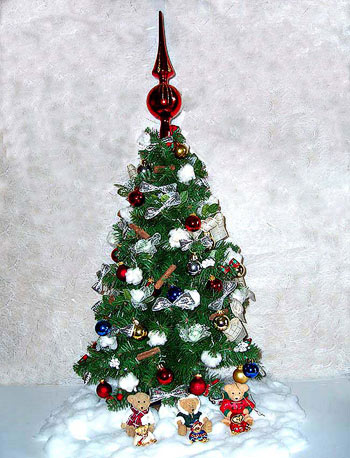
An average Christmas photo, a bit boring. Let’s tune it up with colored lights! They will make it more interesting, even if not more aesthetic. The easiest way to do this is by clicking Filter/Render/Lighting Effects.
2. Basic lighting
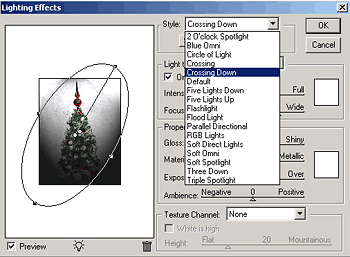
When the window opens, you’ll be greeted by this sight. Before starting to touch up lighting, you should set a basic lamp layout. Choose one from the Style dropdown at the top of the window. For now choose Crossing Down that emulates two spotlights, crossing each other from the top downwards.
3. Lighting window
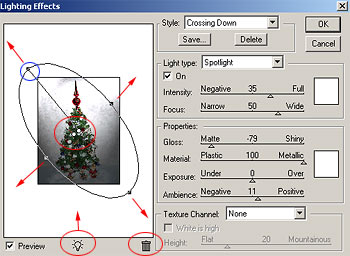
Let’s take a closer look at the controls in the window.
On the left, you’ll find the preview area with a thumbnail of your photo, featuring the lighting effect. You can toggle preview on and off by selecting Preview in the lower left corner.
Under the preview area, in the center, you can see a lightbulb icon. You can drag it onto the picture to add a new light source
Beside it, the trashcan icon serves the opposite purpose. Drag a light source onto it to remove it from the picture.
Added light sources appear in the picture as resizeable circles with handles on the edge. The circle (or ellipse) shows the position and direction of light. Drag the upper and lower handle to stretch the circle and the beam of lighting. By dragging the left and right handles, you can alter the size of the lit area. The center of the circle is always the same color as the light source (white as default). Drag the center point to move the light source. Click it to set the light as active (that is, a subject to options). From the center a straight line goes to a handle (marked with a blue circle in the illustration). In case of spotlights, this is the position of the light source. Imagine a small spotlight placed here, lighting from the upper left corner of the picture towards the center
On the right side of the window, under Light Type, you can set the type of the selected light source. This can be Spotlight, Omni (a circle of light), or Directional light. In this case, you’ll use Spotlight. Select ON to toggle the active light source on/off.
Intensity sets the strength of the light source, while Focus sets the scatter of the circle. Set the color of the light source with the color box on the right side of the area.
4. A world of colors
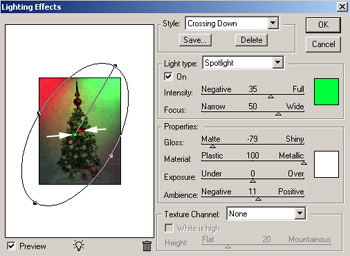
Based on the above, set the basic lighting.
Select a light source by clicking its center, and modify its properties on the right. Now you have two white spotlights crossing downwards. Click one’s center. They are close to each other, as shown by the arrows.
On the right, under Light Type, set the color. I have chosen an apple green. Now set Intensity and Focus as you like.
Click the other light source’s center and set a similar intensity and focus. Make it a different color, e.g. red.
You don’t need to alter the position or size of the light sources. If you still want to, remember that you can stretch them with the upper and lower handles, resize them with the left and right ones, and rotate them with either. You can move the position of the light source by dragging the center.
5. Floodlight
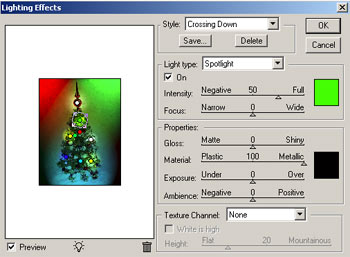
Based on the above, create new light sources in the picture. I have created another spotlight at the bottom, set it toward the center of the tree, and colored it light blue. Afterwards, I have placed several small spotlights of various colors to different places. These should be of small size so that they function as point lights.
After placing all the light sources in the picture and setting them individually, refine the whole of lighting in the Properties area which contains another color box and four sliders.In the lower color box, choose black as the environmental color. It makes the environmental lighting (or rather, un-lighting) darker, more intimate. The functions for the sliders are:
Gloss: Brightness of the lit area. You can set a dull or a glossy surface.
Material: The material of the lit area. You can choose steps between a plastic and a metal surface.
Exposure: The intensity of all the light sources. Can be set between under- and overexposured values.
Ambience: Adds or removes additional dispersed environmental lighting.Set these values as you like.
You shouldn’t touch Texture Channel for now. You can select a color channel here that will be affected by lighting. Height modifies the convexity of the picture (to make it look like a lit relief). In this case, it would look rather ugly, so leave it at None.
6. Jingle bells…
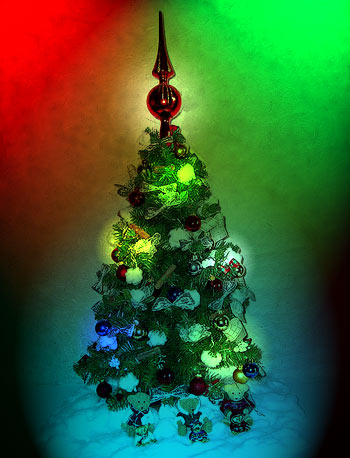
Alas, the boring Christmas tree picture got a festive lighting. The colored lighting has totally changed the mood of the picture.
