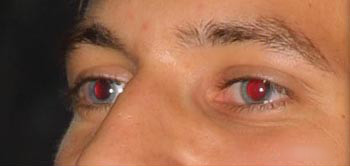
An unearthly red glow emanates from the eyes of your portrait subjects? This phenomenon is typically observed by users of small compact cameras with built-in flashlights. There are several software applications for resolving the problem, often provided with the camera by the manufacturer. Some of them are fairly effective, others aren’t. Failure is usually caused by the program trying to decide automatically how to remove red eye effect. The effect is removed most of the time, but the result looks unnatural even so. Photoshop doesn’t contain built-in red eye removal, but, with some creativity, we can do better than an automated software. There are countless possible methods, one of which is described below.
Open the photo you wish to edit.
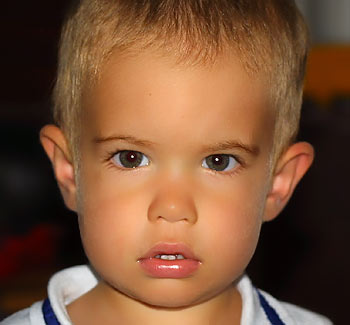
This time, let us focus on the red eye only.
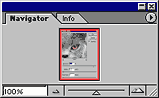 In the Navigator window in the upper-right corner, set zoom to 200-300% (the larger, the better). The aim is to fill the workspace with the red eye(s). Zoom is required for accurate work.
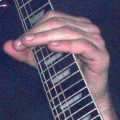
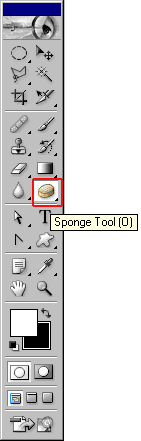 The Sponge Tool, located on the left-side toolbar, is a good friend in many situations. It can be most easily evoked by pressing O. If the icon on the picture is inactive, hover the pointer over the icon (while pressing down the left button), and you can select the Sponge Tool from the appearing list.
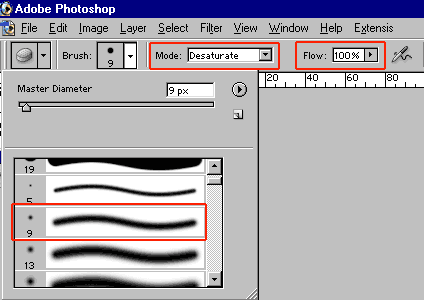
Now that you have selected the tool, set its properties. In Photoshop 7.0 and newer versions, you can find the properties for the current tool on the top of the screen, directly below the main menu. In earlier versions, you can select Options and Brushes among the windows on the right.
First of all, select an adequately sized brush from the upper row of properties. The Sponge Tool will work with this diameter and properties. Red eye removal is best done with a soft brush with a size of 5 to 15 pixels. I have chosen a 9-pixel one. Diameter should always be less than the size of the red eye effect. In the Mode property window, choose Desaturate, as we want to decrease the intensity of a color. Flow shows the strength of the tool. Set it to 100%.
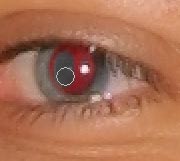 With the Sponge Tool brush, paint inside the red eye area with single clicks, and observe the red color slowly fading. After fading out both red eyes (or just one, if there’s but a single eye showing :)), take a look at the picture to judge how natural the blacks of the eyes look. When dealing with darker reds, desaturation usually gives good enough a result, but “fully flashed”, very bright red eyes require further treatment.
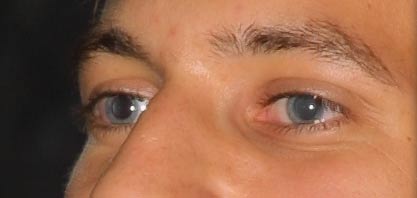
On this picture, the left eye is almost good, but the right one, being lighter, is rather unnatural.
Let’s work on it a while more! Click on the same icon where you have found the Sponge Tool and leave the mouse button pressed. On the dropdown list, click the Burn Tool!
![]()
On the upper properties bar, set the Brush size to a bit smaller than the size of the pupil. On this picture, I found a size of 20 to 25 pixels appropriate. Set Range to Midtones, as we want to darken only the midtones of the picture, and set Exposure to a low value to enable fine work. I used a value of 20%. Now, once again with single clicks inside the black of the eye, darken it to the desired extent. The exact degree is up to you, the main thing is to reach a naturally-looking eye as a result. This is usually not done by darkening to absolute black. Click more into the center of the pupil to make it darker than the edges, which can remain a bit lighter. This also emphasizes the natural character of the eye. Exact degrees are determined by your sense of beauty – remember, this is why you can achieve better results than an automated program!
And here it is, the final result: