One can find more complicated saturation increasing methods than Photoshop’s vanilla Saturation feature. Since it takes more time, it isn’t very practical, but it is definitely worth trying it, at least for some practice with the tone curves we’ll be using as tools. We can also prove that, in skilled hands, Curves can be a most versatile feature. Here’s one of its many uses!
Load the photo

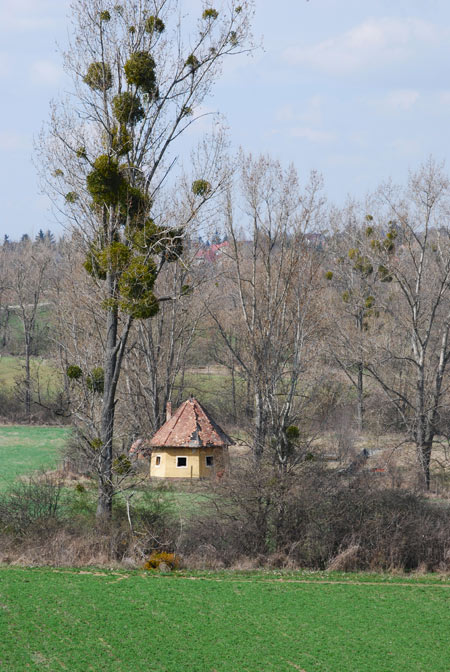
I don’t think much explanation is needed here. Choose a photo which has unsatisfactory color levels. Maybe the colors are dull and weak, or it’s just that you want to emphasize them further.
The sample picture sports pretty low-key colors. It will be a perfect subject for demonstration.
Back to the Lab
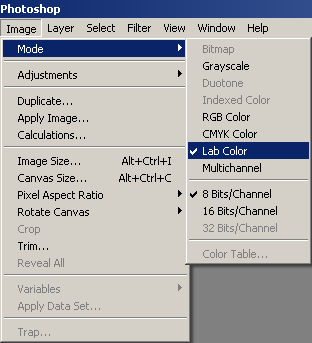
The Lab is a familiar old place which lets us adjust color channels and brightness separately. The photo you have is most probably in the RGB color space which is not suitable for this task.
So first, click Image/Mode and switch to Lab Color mode. Nothing happens to the picture. That is, nothing visible.
Curves for colors
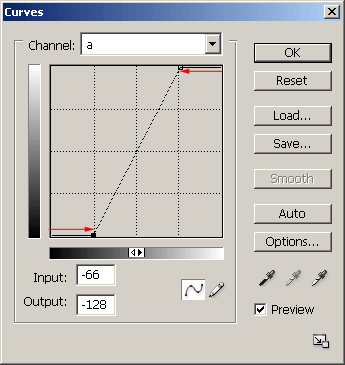
Now we can start adjusting (enhancing) the colors. Click Image/Adjustments/Curves, or press Ctrl+M. From the Channel dropdown, first select the ‘a‘ channel.
Underneath, drag the lower left corner point of the curve inwards to the right, then do the same to the upper right corner point, but to the left. You may first want to click on the point to select it, then specify a value in the Input field. We used the values -66 for the lower point and +66 for the upper one. Be sure to specify similar values to avoid color shifting. 60 to 80 can usually give good results, but you’ll need to adjust the other color channel as well. For the time being, the colors look pretty weird. Do not click OK yet!
Instead, select the ‘b‘ channel from the Channel dropdown, and carry out the very same steps you did with ‘a‘.
As if it were alive
Click OK to finalize the results. Compared to the original, it is obvious that the colors are much more energetic. If you find them too lively, click Edit/Fade Curves to decrease the previous step’s effect.
Before you save the image, you should click Image/Mode again and switch back to RGB Color mode.