Sometimes both you and your photometer may blunder when calculating the correct exposure values. This usually leads to dark, underexposed photos. Of course, you don’t want to discard the picture just because of such a mistake, so what can you do? For example, you can apply digital correction in Photoshop.
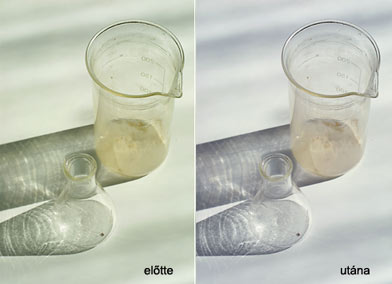
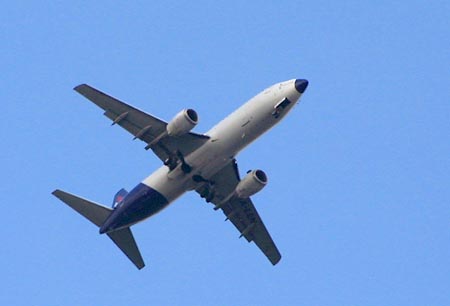
The following photo is rather underexposed, but you may make it acceptable by some follow-up work.
The simplest way to do this is to click Edit/Adjustments/Levels in Photoshop. The menu item opens the following dialog:
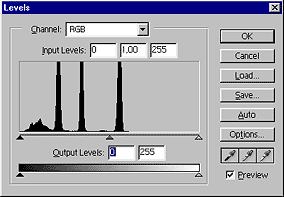
Channel contains the different color channels of the picture. RGB stands for the three color channels (Red, Green, Blue) together. As we don’t need to shift the colors, let’s use RGB.
Input Levels displays numerical values for the dark, midtone and light areas of the image, and underneath you can see the hue distribution on a graph (a so-called histogram). The triangles on the bottom of the dialog let you control the tone areas separately. Their hue identifies which tone areas they belong to.
The scale at the very bottom is for setting Output Levels.
For the time being, let’s focus on Input levels.
The histogram shows that the hue distribution of the photo is uneven. The right area, above the white triangle, show no graph values, so the photo doesn’t contain any lighter areas.
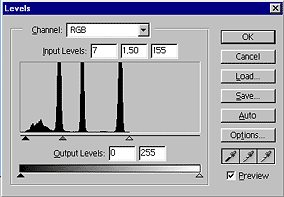
To make the hues even, pull the white triangle on the right side toward the left, until it is under the right side of the of the graph. In the above fields, the right and middle numerical values will change automatically (as you can see, the grey triangle in the middle has also moved to the left). By pulling the right triangle to the edge of the graph, the right number field should show a value around 155. A középső érték 1,34. Of course, these values are only valid for this example, your numbers may vary. The main point is to always pull the triangles to the edges of the black graph, or you may also type the numbers into the fields, and the sliders will move accordingly.
Now repeat the above for the black triangle on the left: pull it a bit to the right, to the left edge of the graph. I have pulled it until the numeric field showed a value of 7. All this time, you can see the effect of the changes on the original image, if you have checked Preview. Take the changes seen on the photo into account.
As you can see, the photo‘s brightness changed a lot. If you still find it too dark or too bright, you can adjust it by moving the middle slider. Pull it to the left for brightening, and to the right for darkening. I have pulled it a bit to the left for this example, so the midtones became somewhat lighter. Now the middle numeric field shows 1.50. As a rule of thumb, pull the middle slider to the point where equal amounts of dark area can be seen on both sides of it. As before, you can also type the numeric values into the fields. Here are the settings:
By clicking OK, I got this picture as a result.
Let me stress it once again that the above values are only for this particular example. Also note that changing the values in a great deal should be avoided. Usually, adjustments are only effective in smaller amounts. In case of severely underexposed images, brightening increases image noise in such a great deal that the photo can become worthless. In such cases, see that you’ve taken a ruined photo. Post-production is not a magic wand: it isn’t effective all the time, and it doesn’t necessarily makes your picture any better.