“Dear Sir or Madam,
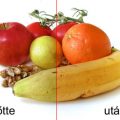
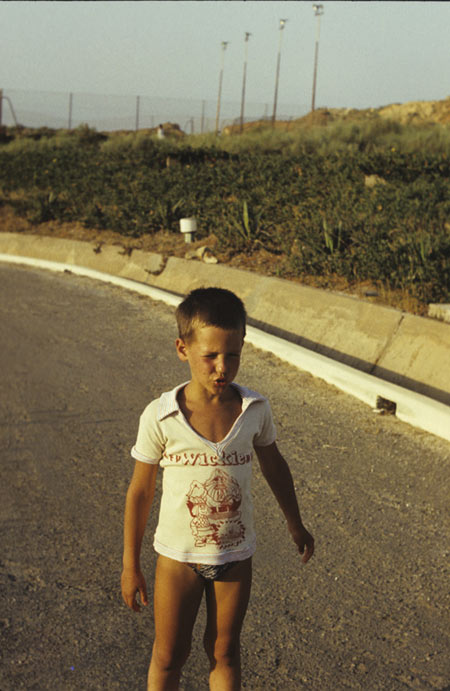
… I’m not really at home in photographs, but I’d like to digitize our family photos. To do so, I have purchased a slide scanner, but the scanned pictures are in quite bad condition (see the attached photo).
Could you help me and give me some advice on how to improve these blackened or yellow/green pictures?
Thank you in advance. Best Regards,
stiglic”
Of course we can. For instance, with the improvement of the photo sent in. This workflow will hopefully help a lot when you edit the rest of the pictures.
Let’s begin with blackening. As paper photos, slides get onto their carriers through chemical methods, some details will vanish in the course of time, and due to chemical processes. Such details may sometimes not be brought back even with professional image editors, but if you want to give it a try, we recommend Shadow/Highlight in Photoshop’s Image/Adjustments menu, which can lighten dark areas without interfering with the brighter parts.
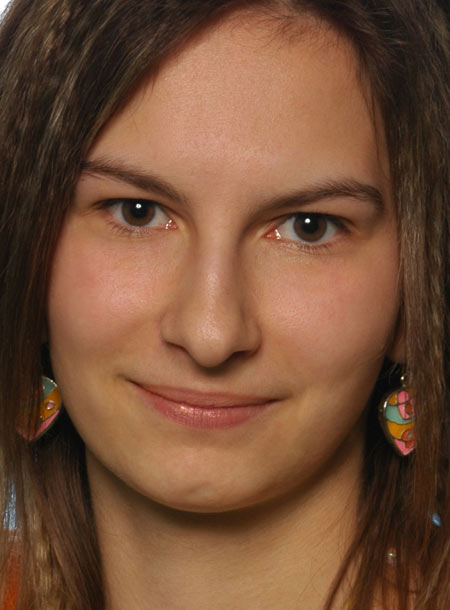
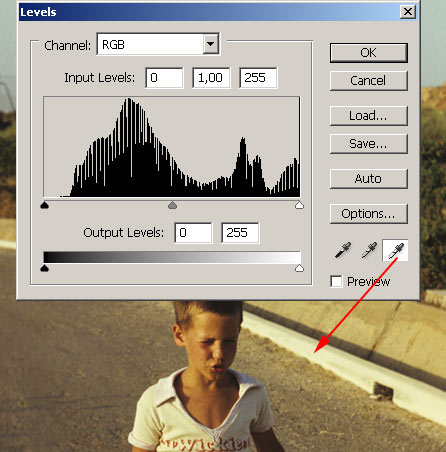
But let’s return to our sample picture. What pokes the eye is the shift in colors. It is covered by a yellow veil, which can be removed by quite a simple technique. Of the various solutions I chose Image/Adjustment/Levels from the menu mentioned above. I clicked on the white eyedropper in the bottom right corner, then I clicked with it on a point of the photo that was once supposedly white. The yellowish edge of the road was ideal for this. It can be regarded as a kind of command. “Turn this spot into white.” we command the program, which then shifts each color in respect of this command. We can only hope that the direction of the shift is a good one.
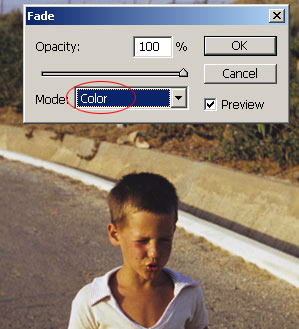
Unfortunately this step may affect brightness, which I did not want to influence yet. Therefore I selected Edit/Fade (Shift+Ctrl+F) menu, which restores previous stages. Colors look better now so I did not restore those, just brightness. In Mode option I selected Color and so the colors that changed did not go back to their original. Apart from them only brightness changed: it is the same as in the original photo.
It is easier to carry out these actions on a correction layer, but I thought I’d show you another way.

Colors begin to look like the supposedly original ones, but there’s still some work to do. For example, the lawn in the background has a lot of blue/magenta, which makes it appear dusty or even scorched by the sun. I chose Image/Adjustments/Selective Colors option and then in the appearing window Yellows, and finally on the Magenta slider at the bottom I decreased the magenta component of yellow colors. Why of yellow color? Because they influence green color the most as well.
I didn’t pay attention to the rest of the picture, just the green of the lawn mattered: I wanted to make it more full of life.
The lawn is fine now, but the rest of the photo has also become quite green. I had to restore the one step earlier stage, but this time not on the whole picture just on the parts excluding the lawn.
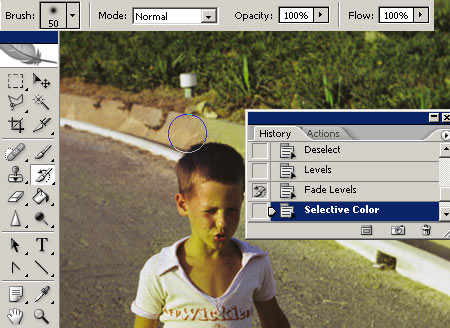
For this I chose a bigger (50 pixels) History Brush in the tools palette. Next I clicked in History in the box left to the row that marks the preceding action, indicating that this is the stage I wish to restore. Then I just painted over everything but the lawn. Thus the green of the grass remained as we changed it, but the colors in the rest of the photo went back to the preceding, more natural stage.
Correction Layers would have come handy again, especially with a mask, but there’s no harm in a bit of painting over.
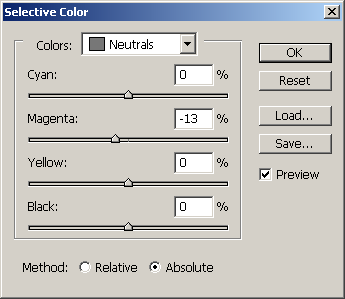
I played it all over with the asphalt, which was also rather purple. Once again, Selective Color played the lead, but instead of the Yellows I decreased the Magenta component in the Neturals sector. And so I have a greyer asphalt now.
It was time to use History Brush again. I took my time to paint over the picture apart from the asphalt, and brought back the preceding stage.
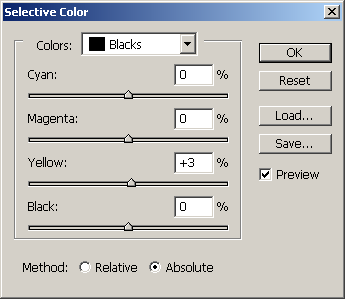
I found the blacks a bit into the blue, so I took out Selective Color once more and now worked with Blacks range. Here I increased Yellow component a little bit. Only to decrease the slight blue hue in the black.
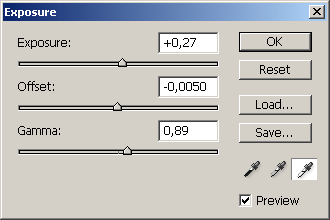
Finally comes the setting of brightness. A soft grey veil also came about, which was immediately gone once I had increase Exposure and Gamma sliders in the Image/Adjustments/Exposure window. I decreased the Offset value a bit, which made the blacks a little more accentuated and the photo a bit more full of contrast. But be careful with it!

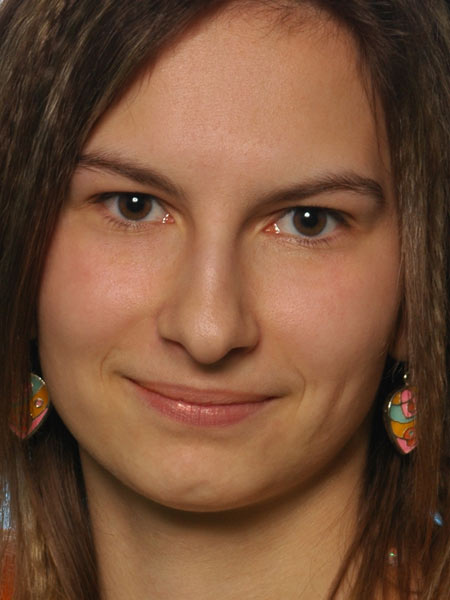
And here comes the result of our work – without the greyish, yellow “curtain”.