This feature entered the world of photo editing algorithms a few years ago. Simply put, it enables magnifying or reducing photos without distorting any important elements (such as the main theme). Finally Adobe Photoshop CS4 also introduced such a feature last autumn. Let’s see how it works out in a very obvious case.
Load the photo in Photoshop

If you want to resize—for example, reduce—this picture, you have two choices: distorting its content, or making the whole picture proportionately smaller.
A transformable layer
One of the old methods is Transform, which also enables resizing.
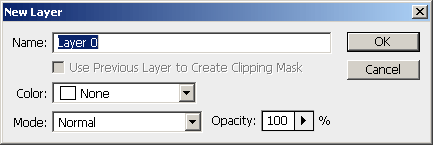
If your photo is on a simple background layer, it is recommended to convert it to a normal resizable layer using Layer/New/Layer. Just click OK on the dialog that appears and you’ll have an editable layer. You’ll also need this step for content-aware scaling (discussed later).
A gaunt distortion
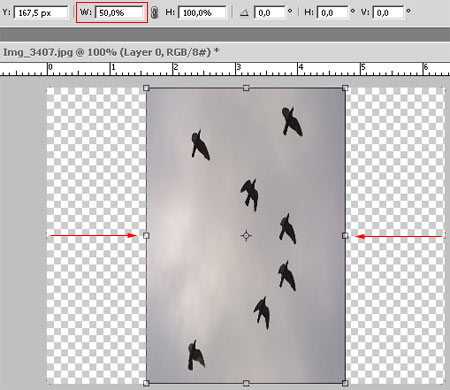
For now, let’s stay with the traditional Transform feature. It is invoked by pressing Ctrl+T.
In the options bar at the top, enter 50% for W (Width). This halves image width.
You can observe easily what happens: picture content is distorted. Everything will be half as wide while retaining full height. The bird silhouettes are undergoing a nasty distortion. Imagine the same with a human portrait, a building or a round ball—not the best way to resize an image, is it?
Everything’s smaller
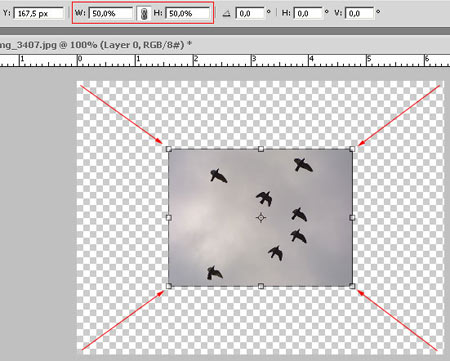
It is better than that to resize both dimensions so that the aspect ratio of the whole content stays unchanged. For a 50% reduction, this means everything will look the same (but half as large) in the picture.
OK, but what if we want only the unimportant areas such as the background or the environment to change, and the main theme (e.g. a portrait or a building) to stay as it is?
Background only
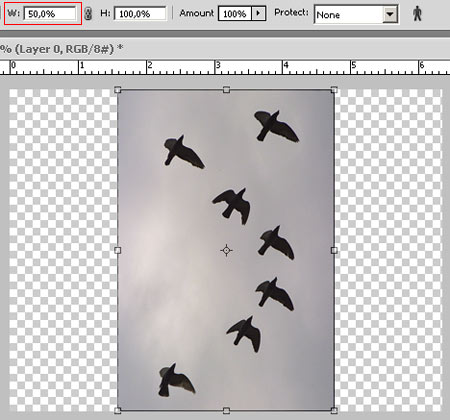
This is what content-aware scaling, a novelty in CS4 does. Click Edit/Content-Aware Scale to access it.
(Keep in mind that photos on a basic background layer—that is, any digital photo—can be resized only after converting it to a separate layer as described in Step 2!)
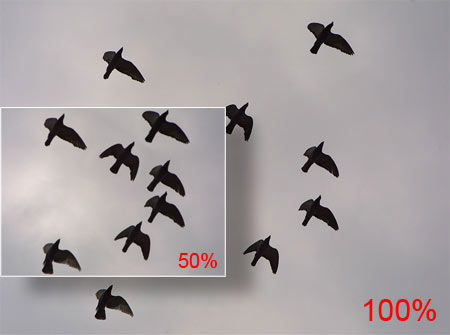
The top option bar looks very much like that of Transform. Percentage settings for height and width are here as well. Let’s try the half-width resizing which we did with Transform. Only width will be reduced. Content-aware scaling produced a smaller image while leaving the bird silhouettes untouched. Only the pixels of the unimportant background were crunched together. Of course we chose this picture on purpose. Such a strong contrast difference makes it easy for the feature to bring a nice result. Most of the time it can preserve contrasty, easily isolable themes, such as the sharp silhouettes here. It can keep them intact while resizing the rest of the image. The photo’s orientation changed from landscape to portrait without distorting any important content.
It’s smaller while it isn’t
The situation is the same if we also halve image height. The area will be thus reduced to one quarter, but the bird silhouettes, appearing as the main theme, still retain their original size. Of course, Content-Aware Scale crowded them together quite strongly. Still, their size and shape is unchanged, only the background, the sky has been compressed, but as it shows no significant image content, the viewer won’t notice it so easily.