“I shot the attached photo in the mid-80s with a CHINON CE-3 MEMOTRON camera and 500mm tele lens. It was digitalized a few years ago. Unfortunately I do not have the negative anymore, and despite several complaints, the developing company couldn’t make a better paper copy out of it.
My “only” wish regarding the picture is to make the scratches inherited from the negative disappear, along with the white dots.”
Zoltán F

When viewing the photo in full size, the dust and scratches, visible as white dots and lines, are indeed rather annoying. Their removal, however, is a fairly easy task in Photoshop.

We used the Filter/Noise/Dust&Scratches effect first. It eliminates bigger white dots quite effectively. We set a relatively large Radius value, 10. Threshold was set to 20. This was necessary because leaving it on 0 would have resulted in a very strong scratch filtering that would have blurred the whole image. Although the original photo couldn’t be called sharp, we didn’t want to remove anything from it, save for dust and scratches. The graininess and the original structure of the photo had to be preserved. Increasing Threshold recovers more and more of the image details, and makes only the shiniest white dots to disappear. Unfortunately the paler scratches remained, but the photo already looks much better than originally.

In order to eliminate the slighter scratches, we used the Healing Brush tool (press J to activate).
You should zoom the photo strongly to be able to work precisely. We chose a soft brush of a not very large size (14). As we only wanted to restore the texture but not yet the colors, we chose the Luminosity blending mode in the Mode dropdown.
We sampled (ALT+left click) a part of the picture, the texture of which is similar to that of the scratched areas, and painted the scratches over with it. The painted lines blended into the background nicely.

As a side effect, Dust&Scratches left behind a few strange blots and blurs in places that didn’t contain any dust or scratches. These are hard to notice at a normal zoom level, but we didn’t want to leave them in the picture anyway.
We set zoom to 300% and pressed Y to activate the History Brush tool with a brush of 15 to 20 pixels. The annoying blots were painted over with this brush. As History Brush restores the original state of the picture by default, the treated areas once again displayed parts of the original.

Both History Brush and Healing Brush requires some practice, but are easy to learn and can produce very realistic illusions. Alas, scratches and white dots gone from the photo.

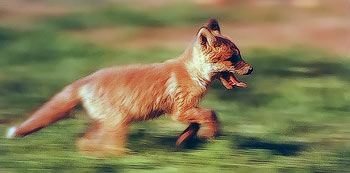
Although our dear reader has not requested it, we still fiddled around with contrast and colors. We used Curves to restore contrast and Selective Color to do the same to colors. The original photo wasn’t very sharp in full size, but reducing it to 700 to 800 pixels wide and sharpening gradually led to a rather acceptable result that, although not quite suitable for printing, can be absolutely fine for web usage.
