We will now fight against noise and blur in this piece. In doing so, we will have to use at least three different tools consequently. For instance, there is Reduce Noise introduced in Photoshop CS, then History Brush, which can be used for a range of actions, and our old friend Unsharp Mask.
Load the photo in Photoshop

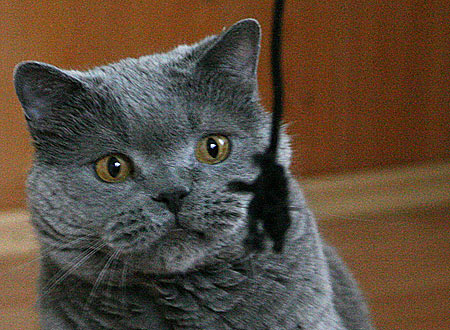
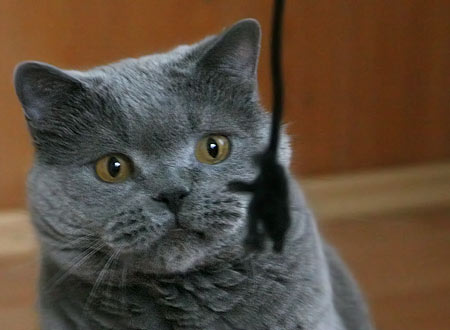
The sample photo is rather blunt and there’s even noise in it. Yet it is our little pet who is gazing around and so we wish to keep this photo and —if possible— improve it a little.
Slow with sharpening!
The improvement should be sharpening perhaps? This is how our ill-starred photo looks like after a medium strength Unsharp Mask. True, it is sharper, but the noise is even more conspicuous this way. It is especially irritating in the more homogenous background. We would expect nice and even blur there instead of the grains. The effect is least visible on the cat’s fur because it is rich in details anyway. On the contrary, the blur here even adds to the noise.
Let’s return to the starting point and start from another direction. Why not remove the noise first?
Color noise
We should distinguish the two kinds of noise, color noise and luminance noise, and deal with them separately. In the first round we want to treat color noise: this is the presence of the disturbing spots in the photo, mostly red and green in our case.
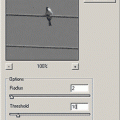
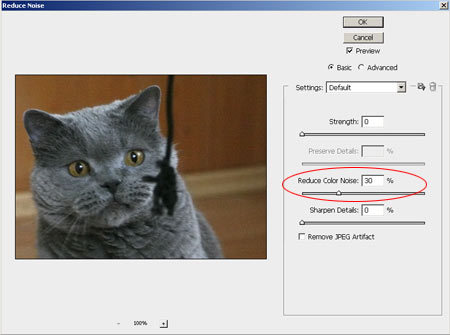
Photoshop’s usual noise removing tool will do: Filter/Noise/Reduce Noise.
Pay attention to Reduce Color Noise in the setup window. Choose a value to your liking on the slider. We chose 30%. Be careful here: a too high value may reduce noise but it will also fade colors. Still, this tool retains picture details, and we don’t have many in this photo.
The rest of the noise
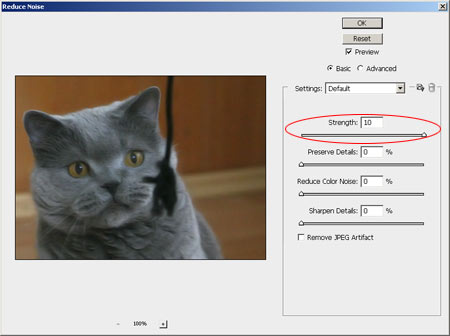
Not only the details are retained but the other component, luminance noise as well. It is in the form of grey grains. This can only be reduced with blurring the details because the software doesn’t know which pixel is a picture part and which one is noise. The more intelligent noise filter softwares result much better effects but there’s many a good tune played on an old fiddle.
Again, resort to Filter/Noise/Reduce Noise command, but this time pay attention to Strength slider only. We used a value of 10 here, which is the strongest blur, but at least nothing is left of the noise.
Sadly, nothing is left of the fine details either. The picture now looks like an oil painting.
Turn the painting into a photo
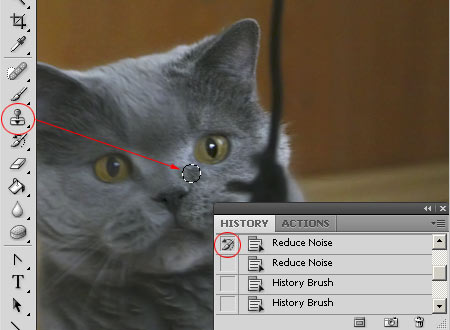
The strong blur did good to the background: it’s become homogenous and noiseless. However, it ruined the cat’s fur. Luckily we have History Brush at our disposal (the Y key), which enables us to restore a previous state in certain parts of a picture. On the tools palette click History Brush, select a brush — preferably one with blurred edges, then on the History palette select as the state to be restored the state before the latest noise filtering. This way the color noise is removed but we can put back the state before luminance noise filtering on the desired parts of the photo.
With care and attention, restore the cat’s fur using the brush. No need to be watchful with the edges, you can omit them. The areas left blurred strengthen the depth of focus in fact. You can also omit the eyes apart from the pupils, softness is beneficial there too.
Thanks to the brush, the fur gets back its previous noisy state, which —as we said — can even be advantageous with a picture so full of details.
Once you have finished, use any sharpening tool, such as Filter/Sharpen/Smart Sharpen or Unsharp Mask to sharpen the picture a bit.
Noiseless little animal
Bring the mouse pointer above the picture to see the original noisy and blunt state. The end-result is a bit soft but the contrast between the nicely blurred background and the re-sharpened fur creates the sensation of sharpness, which diverts the attention from the noise as it is not in a disturbing spot.