What is Adobe’s free online editor capable of?
Last time we finished with uploading our favorite photos into Adobe Photoshop Express‘ photo catalog (called My Photos), which offers organizing, rating, and album managing features apart from publishing. But hold on for a while! The uploaded pictures are nicely sorted into different albums, it’s true, but doesn’t any single one need a bit of sharpening, color adjustment or at least some cropping? This is where the Real Photoshop Thing, photo editing work comes into view. Of course, the Express edition, with its free and easy-to-use web-based user interface, cannot come even close to its widely respected ancestor, but the basic functions mentioned above are accessible, among a few others.
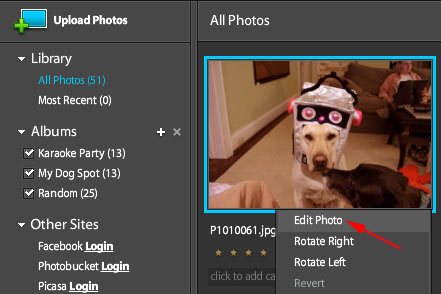
From My Photos, you have three different ways to get to photo editing. You can either click a picture, and then the Edit Photo button at the bottom, or double-click the photo, or hover the mouse pointer over it, and select Edit Photo from the Photo Optionsdropdown. The enlarged version of the picture will be displayed in the work area, while the command column on the left offers 17 different editing options.
There are further settings buttons under the image. The first three zoom the image (the middle one fits it to the work area). Zoom level is displayed on the right as a percentage. The next group contains the undo button, an up arrow for displaying the gallery of all previous steps (history) that enables you to switch back to many of them. Finally, there is another arrow on the right that redoes the undone step, in case you made up your mind. The right side of the bottom part contains four more buttons:
View Original: compare the original state of the photo to the edited one.
Reset All: undo all steps and return to the original picture.
Cancel: quit the editor.
Save: save the edited picture to My Photos.
![]()
Let’s return to the editing options on the left. The 17 features are grouped into three main units—Basic, Tuning (enhancements), and Effects.
Crop & Rotate
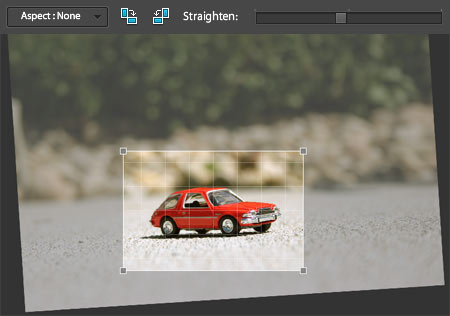
The first feature in the Basic group. If you select an editing feature, its current settings will be displayed above the work area. Crop & Rotate has the following settings:
Aspect: fixed size ratio (select None for unlimited resizing).
Rotate right by 90 degrees
Rotate left by 90 degrees
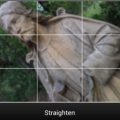
Straighten: straighten the horizon (fine rotation by up to +/- 45 degrees)
Rotation is also accessible by pulling the mouse pointer outside the image, and dragging it holding the left button. This way you can rotate the picture as much—or little—as you like.
To crop a part of the image, first specify Aspect, or if you don’t need a fixed one, leave it at None. You get a grid with four corner handles to select the cropped area. Drag the handles to change selection size. If you rotate the picture in the meantime, the cropping area will change accordingly. When you’re done with the selection, use the buttons at the upper right to decide the fate of the picture. They are:
– reset grid and image to original state (orange arrow)
– cancel changes (red X)
– accepst changes and crop/rotate the image (green check mark)
Auto Correct
Automatic image correction feature, offering six different color, contrast, and lightness adjustments in the top row as small preview images (the first image shows the original state). Click any of them to accept that option. When issuing a correction command (e.g. rotation), a selected check box appears in the row of that editing step. This way you can immediately see which actions were carried out. Deselect the check box to undo the corresponding editing step. Click the empty check box to redo the action.

Exposure
Exposure adjustment also offers seven thumbnails. The middle one is the original, the variants get darker to the left, and lighter to the right. Lightness can be fine-tuned using the slider below the images, between +/- 64 (warning: the numbers are not identical to the exposure values used in photography!)

Red-eye Removal
Removes the red glint in the eyes caused by using flashlights. You have an easy job, just click the red eye and the program will do its best to fix it. Repeat the step for the other eye.

Touchup
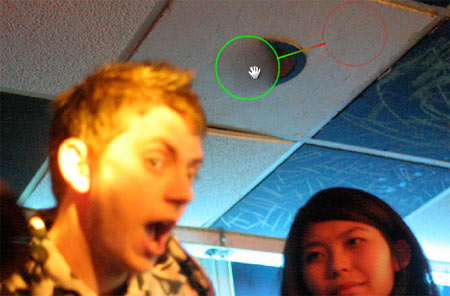
This is perhaps the most powerful retouching tool in Photoshop Express. It is a clone brush of sorts, suitable for tidying up skin defects or other unwanted parts of the picture by covering them up with another picture element.
Simply click the area in question, and drag the pointer to specify the size of the area to be cloned, until the clone spot (circle) is the right size. You can also use the top slider to set this. The sample to be cloned is automatically taken from the adjacent areas, which is not always the best solution. Hover the mouse pointer over the clone spot to display the corrected area in green, and the sampled one in red. You can simply drag both to any other parts of the picture. This lets you take a sample from further areas. The size of the cloned area can also be changed with the top slider. You can repeat the above steps for having multiple cloned and sampled areas.
Saturation
Saturation means the intensity of colors. Just like with Exposure, you get seven thumbnails with the original in the middle and less or more saturated variations on the left and right, respectively. Once again, you have a slider for fine tuning. Below it, you can see a check box called Preserve Skin Tones that changes human skin tones in a lesser degree, in order to have facial colors remain natural even when changing the colors of the picture significantly.

Well, this was the Basic section with the first handful of editing options. Next week, we’ll be discussing the Tuning group.