We aim to lighten only the lower, shadowed part of the photo, and only the dark areas. The sky is appropriately light, so there’s no need to modify it. Photoshop’s basic lightening tools are not suitable for this purpose as they affect the whole of the picture. Versions CS and CS2 already contain the Shadows & Highlights tool for controlling the lightness of light and dark areas. However, it is not always needed, and besides, many people still use older PS versions that don’t offer such a feature. They will surely benefit from this article.
Open the photo in Photoshop
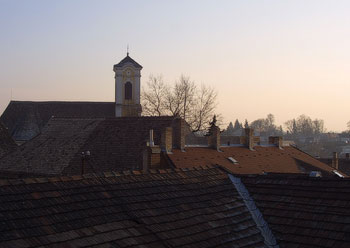
The sample image nicely shows the basic problem this article is about. The sky is too light, while the buildings are covered in shadow. We have to lighten the picture in a way that affects mostly the dark areas since the lighter ones don’t need modification.
Before you begin
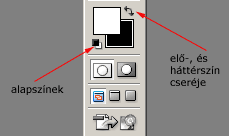
Basic colors / Swapping background and foreground colors
First of all, make sure that black and white are selected in the color picker on the Tools palette. If they are different, click the Basic Colors button.
The default foreground and background colors are black and white, respectively. We have to swap them to provide a white foreground color.
Click the Swap colors button, indicated by an arrow.
White transition
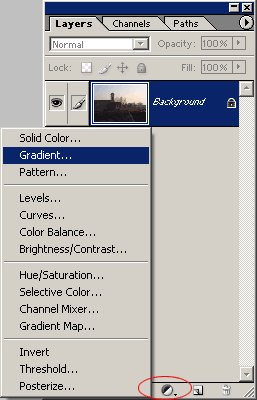
Click the indicated icon at the bottom of the Layers palette, and select Gradient from the dropdown.
Everything’s fine

You don’t have to change anything in the dialog that is displayed. As you chose white as the foreground color, you’ll get a white transition.
Check that all the settings are identical to those in the illustration!
Blending
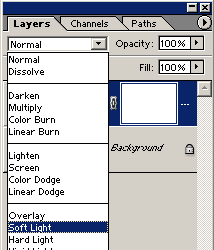
Finally, return to the Layers palette and change the blending mode from Normal to Soft Light.
No bleached skies

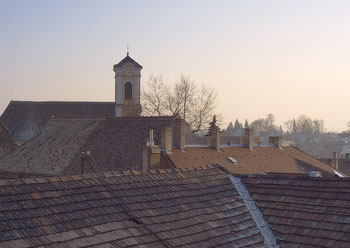
The shadowed buildings have been lightened without over-lightening (bleaching) the sky.
If you find the result lacking in contrast—as in this case—, use the Auto Contrast feature or refer to an earlier article for help.


