Last time we introduced a flagship of noise removal applications, Neat Image. Among other forms, it is available as a Photoshop plugin that has a Standard and an Advanced user mode. This article explains the latter in detail.
Click Filter/Neat Image/Reduce Noise in Photoshop, then Tools/Advanced Mode in Neat Image to activate the advanced interface. The appearance of the application window stays basically the same. Neat Image consists of two main components. First, you assess the extent of noise (profile preparation), then eliminate it (filtering).
Creating a profile (for a picture)
This action starts with the selection of a homogeneous area. It must be larger than 64×64 pixels and it shouldn’t contain any picture elements apart from noise. Good examples are clear sky or a plain wall surface. The program also checks the homogeneity of the selection, and warns of inappropriate choices with an ”area not uniform” message. The text field in the middle of the right-side interface also reports on the selection area. In case of a rectangle of the appropriate size and uniformity, a “selection can be analyzed” message appears. If the assessment area is too small or not heterogeneous, the profile won’t be accurate enough. Accuracy is represented by Profile Quality in the lower right corner. A value of 70 to 80% is quite good. Usually, values under 50% don’t result in proper filtering. The basic selection leads to a very low value (around 20%), but you can do a thing or two to increase it.

The small blue ruler in the Rough Noise Analyzer region enables you to assess the selection area. It makes the plugin roughly determine noise level and structure. The Profile Quality value shows a significant increase. Most of the time, the picture can be filtered by now, but the profile can be further refined with the Fine-Tuning Analyzer. Each of the RGB color channels have 9 sliders for refining the profile. From darker (left side) to lighter (right side) intervals of the current color channel, you can specify stronger (positive) or weaker (negative) profile values. As this is a rather tedious and time-consuming task, it is worthy to rely first on the automatics. Click Auto fine-tune under the sliders to let the program set the values. Color-coded results are displayed in percents above the sliders. Green means the analysis for the interval was successful. Yellow indicates a good result, orange a weaker one, and red stands for an unsuccessful assessment. Unsuccessfully analyzed or non-measured intervals can be treated with Auto Complete. This feature interpolates (estimates) a result from the neighboring values.
The colored bars under the sliders show the assessed intervals and their status. Successful analysis is indicated by all three colors (red/green/blue). Bars striped with yellow signal a very likely incorrect result, while white areas indicate a failure to analyze.
What are the conclusions to draw? What kind of auto-tuning brings good results? If color codes above the sliders are mostly green, with an occasional yellow or two, and all three color channels are indicated below, the fine-tuning for the profile is accurate enough. In order to get an even more accurate result, you should also carry out the same procedure in other homogeneous areas of the image.

Creating a profile (for a camera)
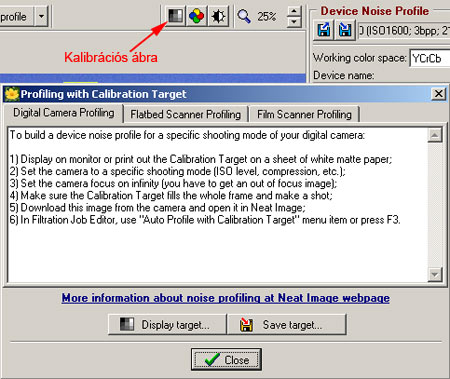
You can make a custom noise profile for your camera (or flatbed or film scanner) to be saved and reused later. You’ll need a calibration target to do so. Click the indicated icon to invoke one. The Digital Camera Profiling tab on the appearing dialog contains all the necessary information. These are the following:
– Click Display Target to display the calibration target on your monitor, and photograph it according to the following instructions.
– You can also click Save Target to save the target. Print it, and take a photo.
– Set the camera to a specified photo mode (ISO, compression, etc.)
– Set focal length to infinite (you need a blurry image).
– Make sure the target fills the whole viewable area.
– Download the photos from the camera and load them into Neat Image.
– Click Profile/Auto Profile with Calibration Target or press F3 to analyze the noise.
Click Tools/Profile Converter to import a camera profile you saved in an earlier version of Neat Image. Click Tools/Batch Converter to create a profile automatically, based on a folder of photos (taken with different ISO settings).
Calibration target
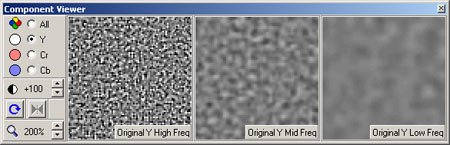
Noise level view
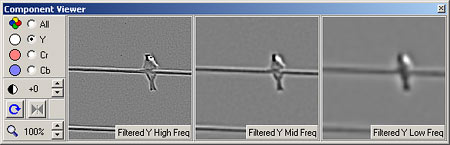
Component Viewer, invoked by the icon next to the one indicated above, helps assessing the noise level. It displays noise per channel. Channels can be selected on the left side of the dialog.
All – all channels
Y – luminance channel (luminance noise)
Cr – color channel (color noise)
Cb – color channel (color noise)
The control underneath these radio buttons sets contrast for the view. Positive values make graininess more easily noticeable even when encountering finer noise.
The images to the right show noise in different frequency intervals: fine (High Freq), medium coarse (Mid Freq) and coarse (Low Freq). These controls have an important role as noise components can be filtered separately, based on either channels or frequency levels.
Noise filtering
This procedure can be carried out on the Noise Filter Settings tab, introduced in the previous tip. This tab is for specifying filtering conditions. The advanced interface allows much more versatile settings.
The huge amount of controls may look excessive at first, but they are really necessary for accurate filtering. The two main regions of the tab are still Noise Levels and Noise Reduction Amounts. The former enables specifying a noise level stronger or weaker than previously assessed. Default values are 0% for frequency levels and +25% for color channels. They can be modified in both directions. Settings can be specified based on the coarseness of noise (High / Mid / Low Freq) or on channels (Y – luminance / Cr – color / Cb – color). The Noise Reduction Amounts contains the same six sliders.
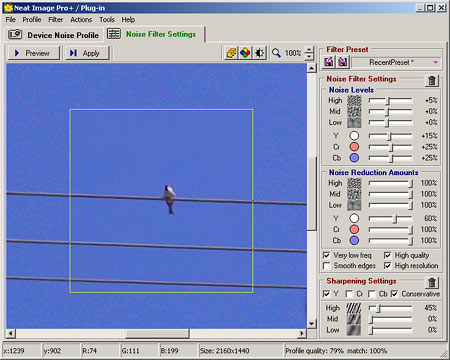
Make sure to zoom the photo to at least 100% before filtering as it is needed to see noise. Just like when creating a profile, you have to start with selecting an area. The plugin filters noise in the selected preview rectangle. This way, you can check the settings and refine them if needed.
Click the middle icon on the upper toolbar to open Component Viewer (explained above) and review noise removal per channel and frequency level. This is where preview really works as removal is controlled per component, and these preview images help you determine how each slider should be set. For example, when looking at the three frequency levels of the Y channel, you can easily decide the proper values for the Y and High/Mid/Low sliders.
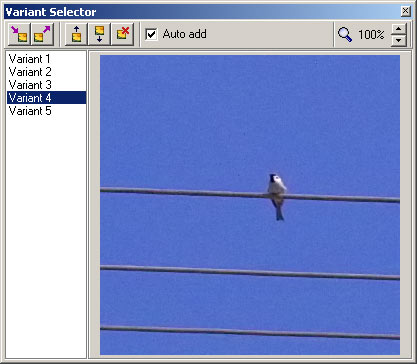
The Variant Selector icon next to Component Viewer also helps a lot. Select Auto Add on its dialog to save all the changes you make (you can also save them by clicking Add New Variant). Click the name of each variant to easily compare them against each other, and click Select Variant to activate the one you like the best.
As you can see, the Neat Image Pro+ plugin stands up to the stand-alone software edition. It offers complex settings and fine-tuning capabilities also as a Photoshop extension. The automatic feature, explained in our previous tip, produces spectacular results in seconds, but the advanced user interface described herein enables an even more complex and accurate filtering. You have nothing to lose, except for noise.