If you want to resize a photo in Photoshop, you”ll almost surely use the Image Size menu command. Its usage seems obvious at a first glance but still, let’s take a look at the settings. Particularly the resizing algorithms deserve a more thorough introduction.
Easy as pie?
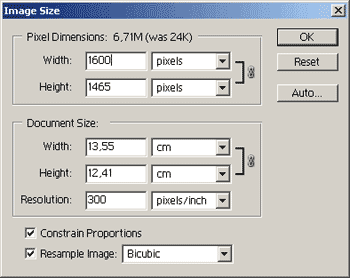
Click Image/Image Size to open the resizing dialog.
The new size can be specified in the upper region called Pixel Dimensions, in pixels or percent. Width and Height are obvious. Select Constrain Proportions to keep the original aspect ratio after resizing. This way, it is enough to specify Height or Width only, and the application will calculate the other value for you. If the check box is unselected, you can specify both values independently, but a different size ratio will distort the picture.
The Document Size section is mostly irrelevant if you only want to display the photo on your monitor. It specifies the output size (e.g., printing size) of the image. Once again, you can specify Height and/or Width, in millimeters, inches or whatever. Resolution specifies output resolution. Once again, it is used for printing. Available units are pixels/inch and pixels/cm. This many pixels will be fitted into one inch or centimeter in print. Higher values produce more detailed prints of a smaller size. Lower values lead to greater sizes, but less detailedness.
Resample Image, at the bottom, is another important option. You can toggle resizing with it. Unselect it to keep the image size fixed and change the resolution only. The dropdown next to it specifies what kind of calculation Photoshop will use for resizing. The application utilizes three simpler calculation methods, Nearest Neighbor, Bilinear, and Bicubic. These are used to calculate the properties of the new pixels created during resizing. For example, think of enlarging a 100×100-pixel photo to 200%, that is, to 200×200 pixels. Obviously, numerous new pixels are created during the procedure. The three algorithms mentioned above determine what color and lightness the new pixels will have.
The guy next door
The simplest one is Nearest Neighbor. During enlarging, the values of newly created pixels are calculated from those of the existing ones. It simply takes the properties of the existing pixel and lends them to its neighbor, too. If the original pixel was light green, the next one will be of the same color as well.
It produces fragmented, rough pictures, particularly when magnifying by larger ratios. However, because exactly the same pixels will be reproduced as in the original picture, only in a larger area, this procedure can be used well for correcting image errors for presentation.
The linear one

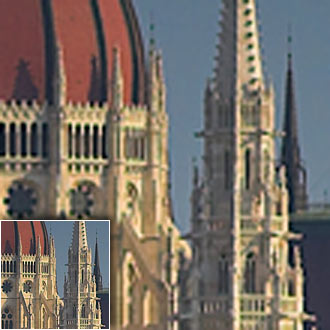
Bilinear interpolation means that the properties of a new pixel are calculated from those of four neighboring ones.
Photos magnified this way are much less fragmented, although rather blurred, lacking details. Edge smoothing is quite weak.
The cubic one
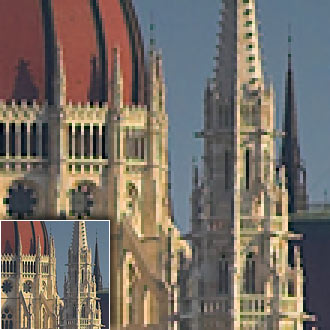
The best result—at least in Photoshop—is produced by the Bicubic algorithm. Values for new pixels are calculated from those of 16 neighboring ones.
The photo will look similar to the one produced by the Bilinear option, but with slightly better edge smoothing and a little more details. This is the default option on the resizing dialog. Usually, you should select this one.
If you want still better results in magnification, use a software tool or plugin especially made for this purpose. One of the best interpolation software, usable for private aims at no cost, is called PhotoZoom. It uses the S-spline algorithm. As for a plugin, we can recommend Genuine Fractals PrintPro, developed for resizing printable images.