There are situations when you have to carry out the same procedure on multiple photos. This can be rather time-consuming even when processing a dozen of them, but adjusting hundreds of pictures usually involves having to take a few days off work. The Actions feature in Photoshop can shorten the time needed to apply repeating actions to multiple pictures. Basically what we do is recording the procedure we want to repeat step by step, and invoke this saved file to carry out the recorded actions on scores of photos. This article discusses the basics of actions, giving you a firm fundament in using them.
For a start, assume you took several photos on your last hiking trip that need an adjustment of light levels, some sharpening, and resizing in order to fit into your web gallery. Since you have numerous pictures, you’ll do the mentioned things manually only once, while recording it as an action. First, let’s take a look at the corresponding palette.
ACTIONS PALETTE
The Actions palette is in the middle right region of the main application window by default. If it isn’t, click Window/Action to toggle it on.

Click the Actions tab on the palette.
You’ll get something like this. As you can see, actions can be sorted into sets for convenient usage and organization. Sets are in grey lines, with a folder sign next to their names. Actions in each folder are in white lines. Double-click set or action names to rename them. The controls for recording and using actions are at the bottom of the palette. From left to right, they are: Stop (square), Record (circle), Play (right arrow), Create new set (folder sign), Create new action (notepad sign), and Delete (trash sign).
CREATE SET
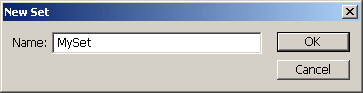
First of all, you’ll want to create a set to store your self-created actions in. Click the 4th icon from the left, showing a folder. This is the Create New Set icon. You can type any name you want, but keep in mind that certain accented characters (if any) in your local language may cause problems. In this case, I named the set MySet. The new set appears selected on the Action palette.
CREATE ACTION
Leave MySet selected and create a new action in it. Before this, open one of the photos you want to edit, so that the things you do to it get saved into the action.
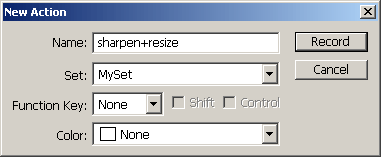
Click the 5th icon from the left, showing a notepad. This is the Create New Action icon. Type a name for the action. You should choose one that tells its function at the first glance. In the example, we called the new action very simply sharpen+resize. You can specify which set you want to store the action in on the Set dialog. For us, it was MySet. Function Key lets you specify a key that triggers the action, and Color sets a background color for the action’s row instead of the default white. For instance, you can paint sharpening actions green and lightening ones red. We left these settings on default.
Click Record to commit your choices and start recording your action. From this point, all the things you do will be recorded, including selections or layer selects. Filters and commands in the upper menu bar get saved only if you click OK for them. That is, if you open a filter dialog, e.g. Unsharp Mask, but make up your mind and close it without clicking OK, the filter won’t be saved in the action. Therefore, the time aspect (how long you fiddle with adjustments) isn’t saved, only the steps you actually carry out. Obviously, this means no matter how long you think about the proper settings, the saved action will only contain the results. When using it, the steps in the action will be carried out instantly.
You can also save Open File or Save File steps in actions.
In the above case, we wanted to adjust light levels in the photo, so we chose Auto Color, which was saved into the action as Levels. Afterwards, we applied a slight sharpening using Unsharp Mask, and resized the picture to 800×600 pixels for web use. The latter step appeared as Image Size.
(There is no need to go into details about the above-mentioned adjustments as the actual settings don’t matter—right now, we’re focusing on how actions work.)
During editing, you may notice the 2nd icon from the left on the Actions palette, Record, is activated, which means your steps are being saved into the action. If you mess up something, invoke an unwanted step or want to undo something, click the 1st icon from the left to stop recording. The steps can be found in recording order under the name of the action. If you did something wrong, you can simply select the unwanted step and drag it to the trash icon below to delete it. In such a case, you should also switch to the History palette and delete the corresponding entry there as well, since deleting it from the action still leaves it valid on the photo you are actually working on now. Deleting it from History undoes it properly. When you’re done, return to the Actions palette, and click Record (the 2nd icon) again to continue recording. If you carried out all the adjustments you wanted, click Stop (the 1st icon).
ORGANIZING ACTIONS
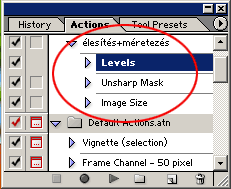
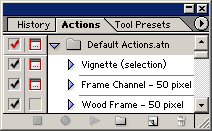
The three steps we made appeared on the palette like this after saving. Now we have an action consisting of multiple steps, which can be easily applied to other pictures. The steps will be carried out on other photos with exactly the same settings, which means that, for instance, sharpening will have the same extent. For different settings, you’ll have to record another action. The check marks on the left side of the panel show that all the steps are active and will be carried out when using the action. If you want to permanently discard any of the steps from the action, drag it to the trash icon. If you want to skip one temporarily (e.g., you have a picture that doesn’t need sharpening, but does need the other steps), just uncheck its row on the left. You can also drag the steps within an action to change the order in which they are carried out. In a similar manner, you can toggle whole actions on and off, or you can drag them to other positions or sets. This works just like a file manager application (e.g., Windows Explorer), so it shouldn’t cause any difficulties.
Double-click any of the steps to open their settings dialogs and change the settings as needed. Afterwards, the action will carry out the step with the new settings. Suppose you notice that you chose too high values for sharpening. Double-click the Unsharp Mask step name to display the Unsharp Mask dialog and adjust the settings.
SAVING AND LOADING ACTIONS
Sets are important basically because you can save their content into external files, and load them into Photoshop on a different computer.
For saving, click the set name (in the example, it is MySet). In the upper right corner of the palette, you can see a circle button with a right arrow inside. Click it to display a dropdown. Click Save Actions… in the dropdown to save the set with all the actions inside. Saving is done just like saving any other file. The extension for actions is .ATN.
Click the Load Actions… item in the same dropdown to load .ATN files.
PLAYING AN ACTION
If you want to apply a previously recorded action to another picture, load the latter, and select the action you want to use on the Actions palette. Now click the Play icon (the 3rd from the left) to run the procedure automatically. You can then load the next photo and run the action again.
APPLYING AN ACTION TO WHOLE FOLDERS
You may have to carry out a procedure on not a handful of photos but hundreds or thousands of them. This is called batch processing. This is where the advantage of using actions can really show.
Copy all the photos to adjust into a single folder with a recognizable name. Make sure that the folder contains only these files.
Create another folder (outside the one storing the source files!) which will contain the modified images.
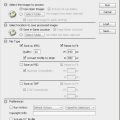
Open Photoshop and click File/Automate/Batch in the main menu (you won’t find such a command on the Actions palette). This dialog appears:
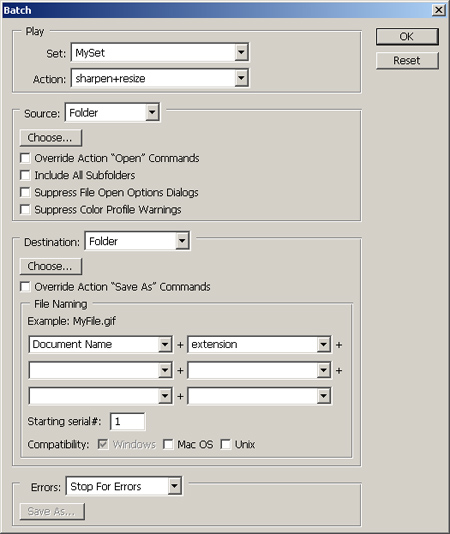
Under Play, you can specify which Set and Action you want to apply to the pictures. In the example, we once again use MySet and sharpen+resize.
Source specifies the source folder with the files to be edited. Click Choose to browse for it. We left the rest of the settings on default. You may need to select the third one (Suppress Color Profile Warning). If you do so, and the color profile of the photo doesn’t match the one handled by the application, you won’t be prompted about it when loading the photo—Photoshop will ignore it. If you won’t be bothered about that, select this option. Otherwise, the application will ask you each time a new photo is loaded with such an error. We chose to be bothered, so left the option unselected.
Destination specifies where the edited photos will be saved. As we created a folder just for that purpose, we selected Folder. If you select Save and Close, the original files will be overwritten instead of saving new ones into another folder. Since we want to preserve the originals, we decide to save the adjusted ones somewhere else. Click Choose to specify where exactly.
If you recorded a Save step into the action, you can select Override Action “Save As” Commands to have it ignored.
The File Naming section lets you choose what kind of names and extensions the adjusted files will have. Using the default value (as in the illustration) results in the modified files having the same names as the originals.
Under Errors, you can set how Photoshop should behave when encountering an error during carrying out the action: you can tell it to stop or to save the error to a log file.
Click OK to have the steps of the selected action carried out on all the pictures in the source folder and the adjusted pictures saved to the destination folder. This way, you can adjust even thousands of photos with the same steps relatively quickly.