Don’t think about serious biological experiments. Cloning is the copying of an arbitrary image area to another place, even into another photo. However, it is much freer than the traditional select-copy-and-paste method as you can use a brush to paint the desired part to its new place. How to cloning image elements in Photoshop Elements.
Load the photo in Photoshop Eelements
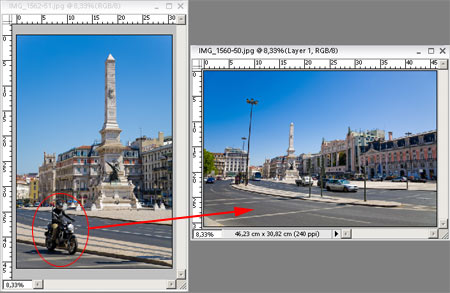
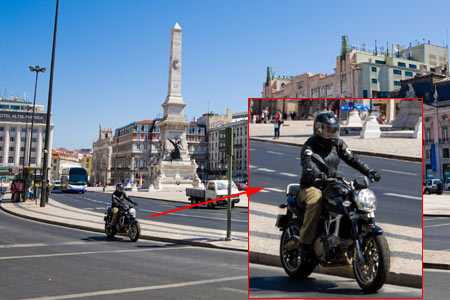
“The photos”, this time, since you’ll be cloning an element from one picture into the other. The lower left corner of the street on the right is too empty, so we’ll take a motorcyclist from another photo (taken at the same location) and copy him there to make the picture more lively.
A new layer
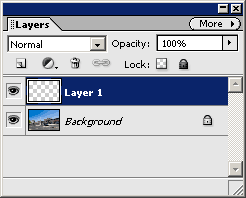
Before you start cloning, prepare a new blank layer. Click the first button on the top toolbar of the Layers palette, or click Layer/New/Layer in the menu.
You’ll copy the motorcyclist onto his new layer so that you can handle him separately from the original photo elements.
Selecting
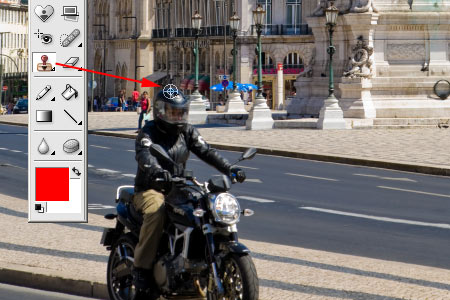
The first step in cloning is the selection of content to be copied. First, choose the photo out of which you want to copy a theme. In this example, this means the guy with the motorbike. Now find the Clone Stamp Tool on the toolbar (or press S). If you want to copy a large theme, choose a large brush size and while keeping Alt pressed, click a point in the theme to be copied—preferably, a point on one of its edges. By doing this, you specified the starting point of the copied area.
Copying
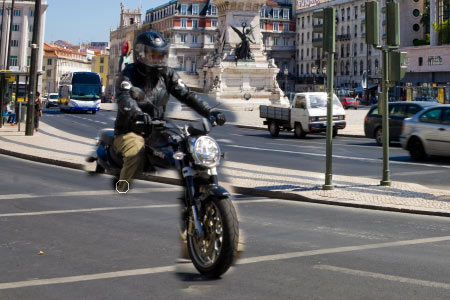
Now switch to the other photo and with the Clone brush, click the point where you want to copy the theme to. It should be about the point where you want the previously specified part to appear. Keep in mind that the whole theme should fit into the new photo. If something runs over the edges, you cannot move it into the picture later.
Paint the copied theme onto the new picture with firm strokes. It doesn’t matter if some unwanted elements appear, or even if the theme is not exactly in the desired position or if it’s a bit too large. This is why you’re cloning it to a new layer. This way it will be resizable and moveable, and unwanted parts can be easily deleted. That is, the theme can be fitted into the photo without affecting the original content.
A sensitive task

The next task is sensitive, but essential. It is the fitting of the copied element into original picture content. This time we’ll have an easy job as the photos were taken at the same location. If you resize the motorcyclist appropriately, it will basically fit into the picture.
Press Ctrl+T and select the cloned content. Keep Shift pressed while adjusting Motorcycle Man’s size to the original picture. Keeping Shift pressed will preserve aspect ratio during the adjustment.
You can drag any corner point for resizing, even in multiple steps. Most of the time, one adjustment will not be accurate enough. Zoom this part of the photo, and carefully fit the cloned element to the surroundings, keeping your attention on the picture’s characteristics (e.g. painted road marks, curbs).
Undesired parts

When you’re done with resizing, you’ll see that some parts are still not good. A few areas that have also been taken over from the previous picture are annoying—they do not fit into the new photo and give the cloning away at the first glance.
They can be simply removed though—this is why you worked on a separate layer. Select the Eraser tool (press E) and simply remove these elements from the picture. The original image layer appears in their place. Take care near the edges of the motorcyclist’s clothes. Use a hard edge eraser if possible and zoom the picture to 100 to 200% size.
Born there
Now it looks as if Motorcycle Man had always been there. Well, he was there at a time, but not when this picture was taken. We were cheating, but made the photo a bit more lively.
When you’re done, click Layer/Flatten Image to merge the layers, and save the picture.