Getting acquainted with main components and tools.
Last time we reviewed the novelties of Corel Paint Shop Pro Photo X2 (what a long name!). Now it’s time to get to know the user interface before delving into more practical things.
Let’s take a tour of the more important groups of the UI. After starting the application, you’ll see something like this.
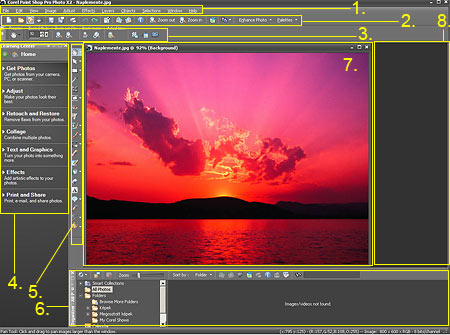
We can separate eight major window regions (indicated in yellow), being the following:
1.Menu bar
2. Standard toolbar
3. Tool options
4. Learning Center
5. Toolbar
6. Picture Organizer
7. Editing interface
8. Palettes (more exactly, their place—palettes can be toggled on and off separately)
The work interface is surely similar if you have used any serious picture editing software. The layout is quite the same most of the time, save for a few differences, like the picture organizer at the bottom, or the brief descriptions in Learning Center. Of course, most regions can be toggled on and off, moved around and resized. Use the Palettes menu at the end of the Standard toolbar to toggle them—but we’ll talk about this later. Drag palettes around the workplace by its header (the thing before the first button). Resize them just like you would do with any application window. When moving a toolbar or a palette, a pin usually appears in the header. Use this to auto-hide the palette—that is, buttons are hidden when out of use, only the header is displayed. Hover your mouse pointer above the header to display the whole palette again. Click the X mark in the upper right corner to toggle a palette off.
1. Menu bar
![]()
The main menu bar is familiar from all types of applications. Nearly all program features can be accessed from these dropdown menus. There’s no need to go into details about every menu item, but here are a few important ones.
File: create a new document, open an existing one, close or save the active one. The same menu contains commands for importing and exporting files, batch image processing, color management and more important options.
Edit: Cut, copy and paste into an image from another. Empty the clipboard, undo or redo the latest action.
View: set the display of the open image and the picture windows. Call for a ruler, a grid or guidelines. The Toolbars submenu allows toggling toolbars on and off, and Palettes does the same with palettes. Ask for a magnifier, change to lighter window borders, or customize the workplace entirely.
Image: change the size and appearance of the image currently under editing. Rotate, resize or mirror the photo. Add borders/picture frames, change color depth, or add a visible or invisible watermark.
Adjust: adjustment options can be automatic (One Step…) as well. Specify brightness, contrast, hue, saturation, depth, sharpness and blur. Apply skin smoothing, shadow lightening, red eye removing, noise filtering, distortion reducing tools and a number of other picture enhancing features. The more interesting ones will be introduced in separate procedure articles.
Effects: custom effects for creating more interesting pictures. These include distortion, artistic effects like pencil drawing or aquarel, film effects and textures.
Layers: options and actions related to layers. Create a new layer, copy an existing one, save and load different layer masks. Again, our time is short to go into deeper details about using layers, which is the very base of modern image editing, but it is (and will be) dealt with in many separate articles.
Objects: align, copy, cut, paste, group or ungroup picture objects.
Selections: options related to the selected picture area. Save, load, enlarge, or reduce the selection, edit it in many different ways, all from this menu.
Window: specify the layout for the workplace, palettes and windows.
Help: version information, developer contacts, and of course, help and tutorial documentation for the software.
2. Standard toolbar
The most important items from the above menu groups, represented by buttons. Click View/Customize to edit which buttons are displayed. The default button set (left to right): New document, Open file, Open/close organizer, Scan image, Save, Save as, Print, Undo, Redo, Resize, Rotate left, Rotate right, Image information, Zoom out, Zoom in, Express Lab, Advanced copy, Enhance photo menu, Toggle palettes menu.

3. Tool options
Options for the currently selected tool. Obviously, different options are available for the various tools. The illustration shows options for the Move tool, including Zoom %, Zoom in/out, Zoom more, Reset to actual size, Fit window to image, Fit image to window, Fit image and window to screen.
![]()
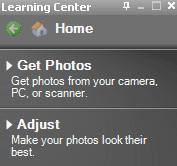
4. Learning Center
An outstanding feature in Paint Shop Pro for new users. Displays textual information about the currently selected tool (in the installation language). You can auto-hide, resize or even close this window if not needed. Click Palettes/Learning Center on the toolbar to toggle it on and off.
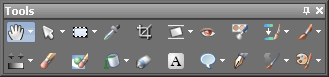
5. Toolbar
One of the most important palettes in the application. You should keep it displayed all times if possible (click View/Toolbars/Tools to toggle it). This is where you can find the most important photo editing features from selecting, cutting and moving tools through red eye removal, skin smoothing and cloning to text, paint bucket, coloring and erasing. Most tools can be activated by a hotkey which is displayed next to their name.
Some buttons can be used to select different tools if you press and hold the down arrow on their right side. The default settings for the selected tool (such as the size and color of a brush) can be found in the Tool options bar discussed in Step 3. Since these are very important, we shall list them here by name (without detailed descriptions):
– Pan / Zoom
– Pick / Move
– Selection / Freehand Selection / Magic Wand
– Dropper
– Crop Tool
– Straighten / Perspective Correction
– Red Eye Tool
– Makeover Tool
– Clone Brush / Scratch Remover / Object Remover
– Paint Brush / Airbrush
– Lighten/Darken / Dodge / Burn / Smudge / Push / Soften / Sharpen / Emboss / Saturation Up, Down / Hue Up, Down / Change to Target / Color Replace
– Eraser Tool
– Background Eraser Tool
– Flood Fill / Color Changer
– Picture Tube Tool
– Text Tool
– Preset Shape / Rectangle / Ellipse / Symmetric Shape
– Pen Tool
– Warp Brush / Mesh Warp Tool
– Oil Brush / Chalk / Pastel / Crayon / Colored Pencil / Marker / Palette Knife / Smear / Art Eraser
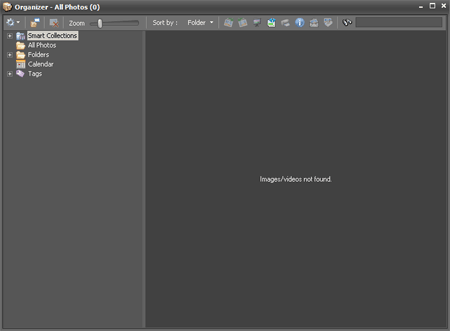
6. Picture organizer
Another unique feature in PSP is the built-in organizer which can be displayed as a separate window on the main editing interface. You can organize the edited images into custom folders for easy lookup. Files can be Sorted by various aspects. You can search, print, e-mail, or rotate them, or open Express Lab to correct major errors.
7. Editing interface
This is where opened images are displayed. Their layout can be adjusted using the Window menu. Under the View menu, you can toggle a Ruler on the borders, or switch on a Grid or Guides to aid in resizing and snapping.

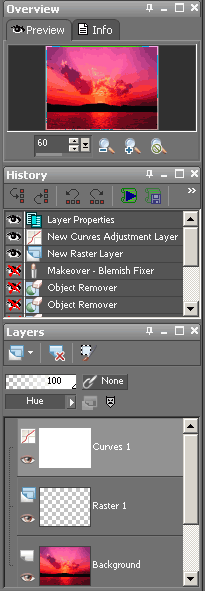
8. Palettes
You can use the View menu or Palettes on the Standard toolbar to toggle the main palettes in Paint Shop Pro on and off. Most of these appear on the right side of the interface, but you can move and resize them just like the toolbars and windows described above. The palettes you can choose from:
Brush variance
Histogram for hue distribution
History of editing actions and undo options for them
Layers, blending modes and their options
Learning Center
Materials: color palettes, textures, gradients
Mixer for colors and brushes
Overview and resizing
Photo Tray with previews of the opened images
Script Output info control
Tool Options
Now that we looked around on the user interface, it’s time to try the software in practice. The next time we’ll be offering practical tips and procedures.
If you like the software, a 30-day trial can be downloaded free of charge from the developer after a quick registration.