Often we need to edit only a part of a picture. In such cases it is advisable to select this area because the selected picture part is primary for the software. Photoshop will execute the commands only in this part while the rest of the picture remains untouched. It may be difficult to circumscribe complicated forms, yet if that form differs in color or lightness from its surroundings, we are at ease. A possible solution is Calculations command.
Load the photo in Photoshop
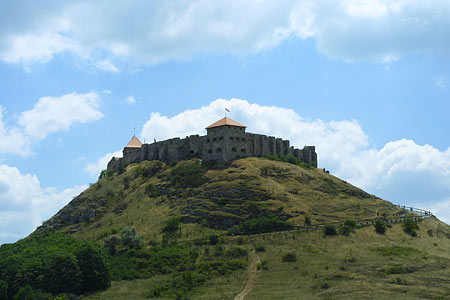
The foreground in the sample photo – that is the hill and the bulk of the castle– is somewhat greyish, dark and without contrast. We would like to see more light in this section so this is where we have to do some editing but we will leave the sky as it is. We need to find a method to mask the whole foreground.
Separate
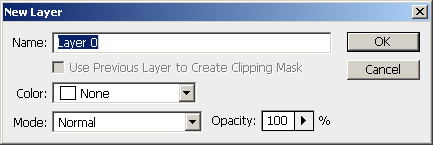
First of all, let’s create a separate layer from the existing background layer. You will need it for the next step.
The simplest way to do so is to double click on the Background layer in the layers palette. Then you get the window shown above and you just have to click OK there. Background layer has now become a separate layer called Layer 0. For the time being, nothing’s changed on the photo though.
We’ll make calculations
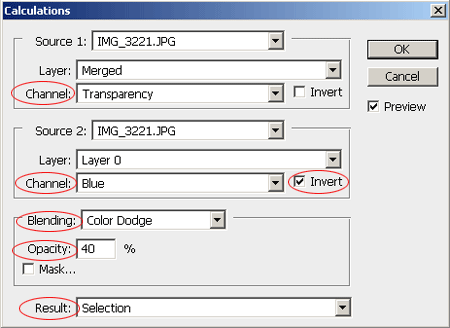
To create the selection mask, choose the Image Adjustments/Calculations command. This is one of the most complex and least user-friendly tools in Photoshop. It can be used to mix pictures or the channels of a singular picture, thereby creating new effects. The possibilities are countless, from which selection mask is only one. For this you need to carry out the modifications shown above.
We have chosen Transparency as Source 1. This option is available only if you carried out step 2. Source 2 is Blue here, this is channel blue. This way we are mixing a transparent channel with a blue one. Transparency channel in the example is completely transparent, i.e. its value is zero. The blue channel contains the color information of the sky blue which we will invert, extract from the selection. As a result, the blue in the sky appears black in the preview.
We have chosen Color Dodge for blending mode since this differentiated the area of the sky from the silhouette of the castle hill. The result can be sophisticated if you vary the Opacity value. When left at 100%, the picture will be very rough and spotted with an inaccurate mask, but the result is much better starting from 90%. Finally we stopped at 40% where the black of the sky is clearly distinguishable from the white selection.
For the next selections it is essential to set Selection value in the Result menu.
All this might sound quite complicated at first so I can only recommend that you experiment with it. The aim is to achieve the selection silhouette (mask) shown in the next point.
The mask is white
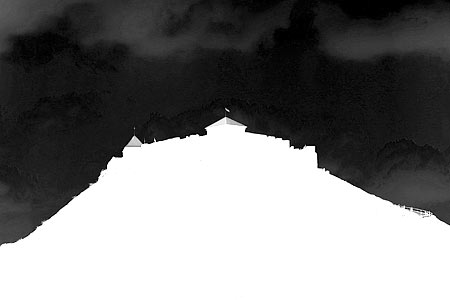
Our mask is ready. You will see the picture above if you haven’t clicked OK yet in the Calculations window.
If you set everything well, the selection area is white unlike the rest of the picture. The parts we don’t want to change appear black. Every dark area will be masked (covered) by the software. Those do not count from the point of view of the selection. Only the light areas will be selected. This is why Selection menu is so important: Photoshop creates a selection from the black and the white mask by pressing OK. Some clouds remain greyish, which will be selected by the software, but it doesn’t really matter since the emphasis is on the foreground.
Naturally, if you work with another picture, the values set above may not work for you. To succeed with separating the desired area, experiment with the settings. Blending and Opacity can bring on especially dramatic changes.
Way to go
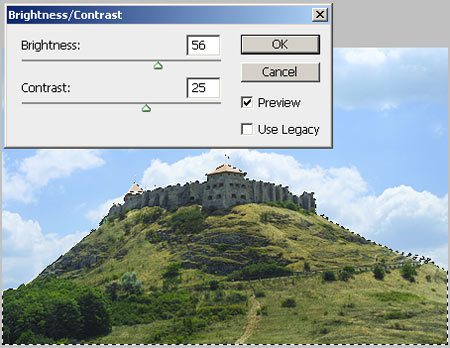
Selection is ready and quite accurate. Only the castle and the bulk of the hill has a fidgety line around them. You can do whatever you like with the selected area. We made it lighter and increased the contrast with the Brightness/Contrast command and then added a little saturation to colors in Hue/Saturation. Both are to be found under Image/Adjustments menu.
Gorgeous

The picture has been revamped. At last the sun is shining once again above the once-dull castle hill. We did not really interfere with the upper part of the image thanks to the accurate selection.