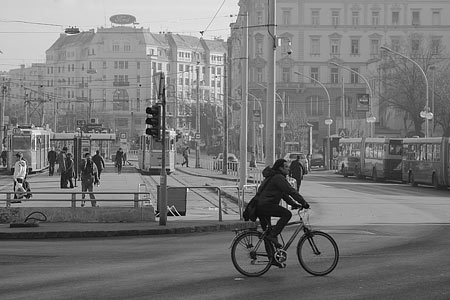
Load the photo in Lightroom

We are not going to discuss decolorization, which is quite a simple action. Every digital camera can take colorless photos, which is achieved by the afterwards desaturation of the color photo. Anybody who finds Saturation or Desaturate tool in the photo editing software is capable of the same thing.
Some cameras have filter effects that go one step further and increase certain hues in the color image or decrease them in a black – and – white photo, and as a result they become lighter or darker. With this technique certain features of a photo can be highlighted, but the interference is nowhere near the extent as with the method we are about to describe.
Real and black – and – white conversion can be achieved through increasing or decreasing the various hue ranges with the help of the software. This is the case now.
One step is not enough
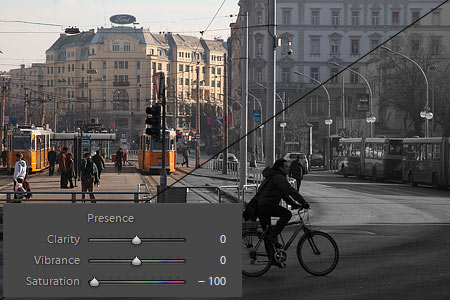
We are hereby working with Adobe Lightroom software on a freshly-made RAW image, which is in this case a city spot shown in the color photo in point 1. If you load this picture in Lightroom with the intention of converting it to black – and – white, all you need to do is find Presence window in Develop section and decrease Saturation value to -100. This way all color will disappear from the picture. The task is not finished yet though.
Simple discolorization will often remove certain colors that played an important role in emphasizing a theme in the original picture. The black – and – white version no longer has the thrilling effect as the original one. The picture above is quite boring too, but to be honest, its colored version was just as boring. With some tone correction, however, we can certainly highlight certain details. For instance, the biker in the foreground.
Directly
For the tone correction, use Tone Curve window we talked about earlier a few rows under Saturation slide.
There is a yet unknown tool in the top left corner of the window. It is a marquee tool. Click on the small circle icon found there and then to any point in the picture and you can select directly the select the tone you want to modify. Bet let’s go step by step. First click on this icon.
Aside with sliders.
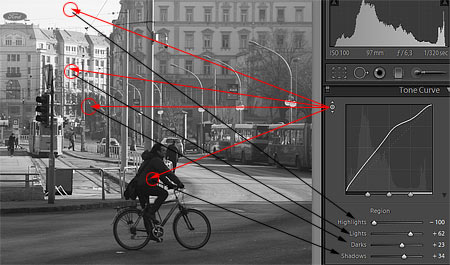
Next check out the various hue ranges in the picture. You will find four ranges in Tone Curve:
Highlights: The lightest colors of the picture, areas close to white.
Lights: The light parts of the picture.
Darks: The dark parts of the picture.
Shadows: the shady areas, close to black.
If you click on the icon mentioned above and then on the almost white sky, and then move the mouse up or down while keeping the left button pressed, you can influence Highlights. Move the mouse upwards to make these parts lighter, and downwards to make them appear darker. Take a glance at Highlights slider to check how its value changes accordingly.
Next find a light grey area, click on it and drag the mouse pointer over the image with the button pressed. You are now influencing the Lights slider, the light areas. Finally repeat the action on a darker grey (Darks) and a close to black area (Shadows) as well. All the pixels will change in accordance with the darkness of the area you clicked on, without having to interfere with the sliders.
Histogram of Tone Curve window will be of help in this. If you drag the mouse pointer over any point of the picture, histogram will indicate whether it belongs to Highlights, Lights, Darks or Shadows hue range, or in other words, to which slider will be effected if you make changes at that point.
You can carry this out at any point of the picture and later fine-tune the lightness or darkness of the given range at another point of the picture too.
A simple frame
We clicked on some points of the image and then by using the mouse we shifted the sliders to and fro until we managed to keep shady areas dark and surpass the others. The background has become a bit foggy, but as a result, it doesn’t look so crowded any more and has become of secondary importance. The biker was dark almost all over and so by increasing the shadows he now emerges from the grey, insignificant background. We succeeded in making him the main theme of the photo.
By the way, on the left of the work window in the Presets section excellent effects can be given additionally to the picture (Sepia, cyanotype, old photo, etc.). It’s worth experimenting with them after the above settings.